# Welcome to D-Link Support

Welcome to the Support Center.  Find everything you need to get the most out of your product — from downloads and manuals to FAQs and troubleshooting guides.  We’re here to help you every step.

## Getting started

{% hint style="danger" %}

### 🚧 **Support Website Upgrade in Progress** 🚧&#x20;

#### We’re currently upgrading our Support Website to serve you better. During this process, some product models may not appear in the search results.<br>

#### 👉 If you cannot find your model, please fill us at ➡️  [Tech Support](https://www.dlink.com.sg/pages/tech-support)<br>

#### Thank you for your patience and understanding.

{% endhint %}

## **✨ Finding help is now even easier!**

Just tap the **Ask** button <img src="/files/focJnEndQ5p1LWe8LPoF" alt="" data-size="line"> in the top search bar — it will quickly guide you to the right answers, guides, or downloads available.

## Explore our resources

We've put together a variety of helpful guides and links to support you.

<table data-card-size="large" data-view="cards"><thead><tr><th></th><th></th><th data-type="content-ref"></th><th data-hidden data-card-cover data-type="files"></th></tr></thead><tbody><tr><td><strong>For Consumer</strong></td><td>Browse D-Link Consumer Products updates and documentation.</td><td><a href="/spaces/AsNvP4j1V0u2MDOjtqo2">/spaces/AsNvP4j1V0u2MDOjtqo2</a></td><td></td></tr><tr><td><strong>For Business</strong></td><td>Browse D-Link Business Range of support available to get help and started.</td><td><a href="/spaces/IcQ2ZX7oJ86Yd4idZyaf">/spaces/IcQ2ZX7oJ86Yd4idZyaf</a></td><td></td></tr><tr><td><strong>24x7 Live Chat</strong></td><td>We provide 24x7 LiveChat with AI Local Languages Support</td><td><a href="https://www.dlink.com.sg/">https://www.dlink.com.sg/</a></td><td></td></tr><tr><td><strong>24x7 Hotline</strong></td><td>Preferred to call? We are always available to assist.</td><td><a href="https://www.dlink.com.sg/pages/contact">https://www.dlink.com.sg/pages/contact</a></td><td></td></tr></tbody></table>


# backup - do not use

Welcome to the Support Center.  Find everything you need to get the most out of your product — from downloads and manuals to FAQs and troubleshooting guides.  We’re here to help you every step.

## Getting started

{% hint style="danger" %}

### 🚧 **Support Website Upgrade in Progress** 🚧&#x20;

#### We’re currently upgrading our Support Website to serve you better. During this process, some product models may not appear in the search results.<br>

#### 👉 If you cannot find your model, please temporarily visit our alternative support page at ➡️ [**D-Link Download Site**](https://www.dlink.com.my/category/support-main/download-center/)<br>

#### Thank you for your patience and understanding.

{% endhint %}

## **✨ Finding help is now even easier!**

Just tap the **Ask** button <img src="/files/focJnEndQ5p1LWe8LPoF" alt="" data-size="line"> in the top search bar — it will quickly guide you to the right answers, guides, or downloads available.

## Explore our resources

We've put together a variety of helpful guides and links to support you.

<table data-card-size="large" data-view="cards"><thead><tr><th></th><th></th><th data-type="content-ref"></th><th data-hidden data-card-cover data-type="files"></th></tr></thead><tbody><tr><td><strong>For Consumer</strong></td><td>Browse D-Link Consumer Products updates and documentation.</td><td><a href="/spaces/AsNvP4j1V0u2MDOjtqo2">/spaces/AsNvP4j1V0u2MDOjtqo2</a></td><td></td></tr><tr><td><strong>For Business</strong></td><td>Browse D-Link Business Range of support available to get help and started.</td><td><a href="/spaces/IcQ2ZX7oJ86Yd4idZyaf">/spaces/IcQ2ZX7oJ86Yd4idZyaf</a></td><td></td></tr><tr><td><strong>24x7 Live Chat</strong></td><td>We provide 24x7 LiveChat with AI Local Languages Support</td><td><a href="https://www.dlink.com.sg/">https://www.dlink.com.sg/</a></td><td></td></tr><tr><td><strong>24x7 Hotline</strong></td><td>Preferred to call? We are always available to assist.</td><td><a href="https://www.dlink.com.sg/pages/contact">https://www.dlink.com.sg/pages/contact</a></td><td></td></tr></tbody></table>


# Warranty

### Warranty Period

Kindly visit respective country for more information.\
Indonesia > [https://www.dlink.co.id](https://www.dlink.co.id/)\
Malaysia > [https://www.dlink.com.my](https://www.dlink.com.my/)\
Philippines > [https://www.dlink.com.ph](https://www.dlink.com.ph/)\
Singapore > [https://www.dlink.com.sg](https://www.dlink.com.sg/)\
Thailand > [https://www.dlink.co.th](https://www.dlink.co.th/)\
Vietnam > [https://www.dlink.com.vn](https://www.dlink.com.vn/)

### Warranty Registration

For Warranty Registration, visit here [**https://warranty.dlink.com.sg/**](https://warranty.dlink.com.sg/)


# Cloud Management Services Terms & Conditions

Terms and Conditions for Lifetime Free Cloud Management

## 1. Acceptance of Terms

By activating, registering, or using the D-Link cloud management services, you agree to be bound by these Terms and Conditions.

***

## 2. Definition of Lifetime Free Cloud Management

“Lifetime Free Cloud Management” refers to the availability of basic cloud based device management services provided by D-Link for supported devices for the operational lifetime of the product.

The service allows users to register, configure, monitor, and manage compatible D-Link devices through the designated D-Link cloud management platform without recurring license fees.

***

## 3. Scope of Free Cloud Services

The lifetime free cloud service includes standard cloud management features such as:

* Device onboarding and registration
* Remote configuration and monitoring
* Firmware management and upgrade notifications
* Basic network monitoring and device status reporting
* Standard cloud dashboard access

The specific features included in the free service may vary depending on product model and platform capabilities.

***

## 4. Definition of Product Lifetime

“Product lifetime” refers to the period during which the product:

* remains supported by D-Link cloud infrastructure, and
* continues to operate with the compatible cloud platform.

Product lifetime does not mean the lifetime of the purchaser or the physical durability of the hardware components.

***

## 5. Service Availability

Cloud services depend on:

* internet connectivity
* availability of D-Link cloud servers
* compatibility between device firmware and cloud platform.

D-Link does not guarantee uninterrupted or error free cloud service availability.

***

## 6. Advanced or Premium Features

Certain features may be introduced in the future that are classified as advanced or premium services. These features may require:

* separate subscription
* additional licenses
* paid service plans.

The lifetime free cloud management applies only to the basic cloud management functions.

***

## 7. Platform Evolution and Service Changes

D-Link reserves the right to:

* modify, update, or improve cloud platform functionality
* adjust available features within the free service tier
* discontinue legacy features or services when necessary.

D-Link reserves the right to transition the Free Cloud Management tier to a different service model or discontinue the free tier entirely upon reasonable notice published on the D-Link website.

Where possible, D-Link will provide reasonable notice before significant service changes.

***

## 8. Product End-of-Support

When a product reaches End-of-Life (EOL) or End-of-Support (EOS) status:

* cloud management services for that product may be limited or discontinued
* firmware updates and security patches may no longer be provided.

Product lifecycle announcements will be published on the official D-Link website.

***

## 9. Service Availability by Region

Cloud management services may vary by country or region due to regulatory requirements, infrastructure availability, or service deployment limitations.

D-Link reserves the right to limit, modify, or discontinue cloud services in certain regions where required by applicable laws, regulations, or operational considerations.

***

## 10. User Responsibilities

Users are responsible for:

* maintaining secure account credentials
* ensuring proper device firmware updates
* complying with all applicable network and cybersecurity regulations.

Misuse of the cloud platform may result in service suspension.

***

## 11. Force Majeure and Infrastructure Outages

D-Link shall not be responsible for any failure or delay in providing cloud services caused by circumstances beyond its reasonable control, including but not limited to:

* internet service disruptions
* cloud infrastructure outages
* data center failures
* cyberattacks or security incidents
* acts of government
* natural disasters or other force majeure events.

***

## 12. LIMITATION OF LIABILITY

To the maximum extent permitted by law, D-Link shall not be liable for:

* service interruptions or downtime
* loss of configuration or operational data
* indirect or consequential damages arising from use of the cloud service.

***

## 13. Cloud Service and Hardware Warranty

These terms apply to Cloud Management Services only and are separate from the D-Link Hardware Warranty provided with this product.

***

## 14. Governing Law

These Terms and Conditions shall be governed by and construed in accordance with the laws of the Republic of Singapore.

Any dispute arising out of or in connection with these Terms and Conditions shall be subject to the exclusive jurisdiction of the courts of the Republic of Singapore.

***

## 15. Terms Updates and Access to Latest Version

D-Link may revise these Terms and Conditions from time to time.

Users are advised to visit here or [www.dlink.com.sg](http://www.dlink.com.sg/) to get the latest version of “Terms and Conditions for Lifetime Free Cloud Management.”


# Welcome!

{% hint style="danger" %}

#### 🚧 **Support Website Upgrade in Progress** 🚧

We’re currently upgrading our Support Website to serve you better. During this process, some product models may not appear in the search results.<br>

👉 If you cannot find your model, please fill us at ➡️  [Tech Support](https://www.dlink.com.sg/pages/tech-support)<br>

Thank you for your patience and understanding.
{% endhint %}

## **✨ Finding help is now even easier!**

Just tap the **Ask** button <img src="https://support.dlink.com.sg/~gitbook/image?url=https%3A%2F%2F3440927398-files.gitbook.io%2F%7E%2Ffiles%2Fv0%2Fb%2Fgitbook-x-prod.appspot.com%2Fo%2Fspaces%252FJQ3gkaNmgcdZSr1S0dWH%252Fuploads%252FM75M4srFTidnUhjg9CGp%252FAsk.png%3Falt%3Dmedia%26token%3Dd5b66b29-1e47-4fd1-86ad-33654f2a9fa0&#x26;width=66&#x26;dpr=4&#x26;quality=100&#x26;sign=81bf32b5&#x26;sv=2" alt="" data-size="line"> in the top search bar — it will quickly guide you to the right answers, guides, or downloads available.

{% tabs %}
{% tab title="Wi-Fi 7 Multi-Gig" %}
{% content-ref url="/spaces/AsNvP4j1V0u2MDOjtqo2/pages/Ac8kz9sIlIDlkJxVKHNu" %}
[DIR-BE3602](/consumer/wi-fi-7-multi-gigabit-router/dir-be3602)
{% endcontent-ref %}

{% content-ref url="/spaces/AsNvP4j1V0u2MDOjtqo2/pages/65NmOEIeeIEE1ydkWmqh" %}
[DPN-BE7200GR](/consumer/wi-fi-7-multi-gigabit-router/dpn-be7200gr)
{% endcontent-ref %}

{% content-ref url="/spaces/AsNvP4j1V0u2MDOjtqo2/pages/JbhBJdnEBsaBUaiDfxAZ" %}
[DPN-BE7212GR](/consumer/wi-fi-7-multi-gigabit-router/dpn-be7212gr)
{% endcontent-ref %}

{% content-ref url="/spaces/AsNvP4j1V0u2MDOjtqo2/pages/zv7M5jtXnmdffQgYZqiC" %}
[DPN-BE19000GR](/consumer/wi-fi-7-multi-gigabit-router/dpn-be19000gr)
{% endcontent-ref %}
{% endtab %}

{% tab title="Wi-Fi Router" %}
{% content-ref url="/spaces/AsNvP4j1V0u2MDOjtqo2/pages/VGNoWjZUEWuhxVaaX0yn" %}
[DIR-X3000Z](/consumer/wi-fi-router/dir-x3000z)
{% endcontent-ref %}

{% content-ref url="/spaces/AsNvP4j1V0u2MDOjtqo2/pages/dzwBwYV7any2WdKfc4ld" %}
[DIR-X6080Z](/consumer/wi-fi-router/dir-x6080z)
{% endcontent-ref %}

{% endtab %}

{% tab title="Aquila Pro AI Series" %}
{% content-ref url="/spaces/AsNvP4j1V0u2MDOjtqo2/pages/QuIycoHbTIpKF2o7A9Cy" %}
[M30](/consumer/aquila-pro-ai-wi-fi-6-router/m30)
{% endcontent-ref %}

{% content-ref url="/spaces/AsNvP4j1V0u2MDOjtqo2/pages/3bYC9bElq8if7K1qZ2mm" %}
[M32](/consumer/aquila-pro-ai-wi-fi-6-router/m32)
{% endcontent-ref %}

{% content-ref url="/spaces/AsNvP4j1V0u2MDOjtqo2/pages/8YS4ryKMve9h8OXkOPHH" %}
[M60](/consumer/aquila-pro-ai-wi-fi-6-router/m60)
{% endcontent-ref %}

{% endtab %}
{% endtabs %}

{% tabs %}
{% tab title="5G/4G Mobile Hotspot (MiFi)" %}
{% content-ref url="/spaces/AsNvP4j1V0u2MDOjtqo2/pages/rUu9ivZKo0VhJYhUowLK" %}
[DWR-930M](/consumer/5g-4g-mobile-hotspot-mifi/dwr-930m)
{% endcontent-ref %}

{% content-ref url="/spaces/AsNvP4j1V0u2MDOjtqo2/pages/xQMom7IF2RqIrgUZ8nj0" %}
[DWR-932M](/consumer/5g-4g-mobile-hotspot-mifi/dwr-932m)
{% endcontent-ref %}

{% content-ref url="/spaces/AsNvP4j1V0u2MDOjtqo2/pages/uM6zSv9mjK3kmlq1t1Cp" %}
[DWR-940M](/consumer/5g-4g-mobile-hotspot-mifi/dwr-940m)
{% endcontent-ref %}

{% content-ref url="/spaces/AsNvP4j1V0u2MDOjtqo2/pages/TvnZdqxwHVYdbbYiP82s" %}
[DWR-M975X](/consumer/5g-4g-mobile-wi-fi-router/dwr-m975x)
{% endcontent-ref %}

{% content-ref url="/spaces/AsNvP4j1V0u2MDOjtqo2/pages/Qxvs6Q1ipTBebueRuXBs" %}
[DWR-U2000](/consumer/5g-4g-mobile-hotspot-mifi/dwr-u2000)
{% endcontent-ref %}

{% content-ref url="/spaces/AsNvP4j1V0u2MDOjtqo2/pages/j7RGNhTQzfmfueMgikH7" %}
[DWR-U2100 eSIM](/consumer/5g-4g-mobile-hotspot-mifi/dwr-u2100-esim)
{% endcontent-ref %}
{% endtab %}

{% tab title="5G/4G Mobile Wi-Fi Router" %}
{% content-ref url="/spaces/AsNvP4j1V0u2MDOjtqo2/pages/EOvhs4r1MafID1TT68Ei" %}
[G416C](/consumer/5g-4g-mobile-wi-fi-router/g416c)
{% endcontent-ref %}
{% endtab %}
{% endtabs %}

{% tabs %}
{% tab title="Multi-Gig Switch" %}

{% endtab %}

{% tab title="Gigabit Switch" %}
{% content-ref url="/spaces/AsNvP4j1V0u2MDOjtqo2/pages/dpUhBEOqG1waEalg9u9G" %}
[DGS-108](/consumer/switches/dgs-108)
{% endcontent-ref %}

{% endtab %}

{% tab title="250M Switch" %}

{% endtab %}
{% endtabs %}

{% tabs %}
{% tab title="IP Camera" %}
{% content-ref url="/spaces/AsNvP4j1V0u2MDOjtqo2/pages/6rzYdWXmbMYaKqJA7Ila" %}
[DCS-6101LH](/consumer/security-ip-camera/dcs-6101lh)
{% endcontent-ref %}

{% content-ref url="/spaces/AsNvP4j1V0u2MDOjtqo2/pages/aBHmMOOckoCYt8mpDfIb" %}
[DCS-6500LH](/consumer/security-ip-camera/dcs-6500lh)
{% endcontent-ref %}

{% content-ref url="/spaces/AsNvP4j1V0u2MDOjtqo2/pages/hCgUqNXaz2GqKWXhkQ9f" %}
[DCS-6501LH (HWC)](/consumer/security-ip-camera/dcs-6501lh-hwc)
{% endcontent-ref %}

{% content-ref url="/spaces/AsNvP4j1V0u2MDOjtqo2/pages/yBPGyli55vmdmKebYjEf" %}
[DCS-6501LH](/consumer/security-ip-camera/dcs-6501lh)
{% endcontent-ref %}

{% content-ref url="/spaces/AsNvP4j1V0u2MDOjtqo2/pages/2Ty0TNUEQ68enjko4YSz" %}
[DCS-8350LH](/consumer/security-ip-camera/dcs-8350lh)
{% endcontent-ref %}
{% endtab %}

{% tab title="Wi-Fi Adapters" %}
{% content-ref url="/spaces/AsNvP4j1V0u2MDOjtqo2/pages/aXcKIEmTtxsDoZHo922o" %}
[DUB-E135](/consumer/adapters/dub-e135)
{% endcontent-ref %}

{% content-ref url="/spaces/AsNvP4j1V0u2MDOjtqo2/pages/dl0535sz7erGMIISjX18" %}
[DUB-E255](/consumer/adapters/dub-e255)
{% endcontent-ref %}
{% endtab %}

{% tab title="Accessories" %}
{% content-ref url="/spaces/AsNvP4j1V0u2MDOjtqo2/pages/PINkBaQDugFuBZAgMjwN" %}
[DPP-101](/consumer/accessories/dpp-101)
{% endcontent-ref %}
{% endtab %}
{% endtabs %}

{% hint style="info" %}
If your model number isn’t listed here, please use the search bar or browse the menu on the left.
{% endhint %}


# Template

## Datasheet

Insert Data Sheet here

## Downloads/FAQ

{% columns %}
{% column width="50%" %}

{% endcolumn %}

{% column %}

{% endcolumn %}
{% endcolumns %}

***


# Downloads
<table><thead><tr><th width="128.75">Date</th><th width="442.9609375">Version / Changes</th><th data-type="files">Files</th></tr></thead><tbody><tr><td>N.A.</td><td>N.A.</td><td></td></tr><tr><td></td><td></td><td></td></tr><tr><td></td><td></td><td></td></tr></tbody></table>


# FAQs


# Copy of Template

## Datasheet

Insert Data Sheet here

## Downloads/FAQ

{% columns %}
{% column width="50%" %}

{% endcolumn %}

{% column %}

{% endcolumn %}
{% endcolumns %}

***


# Downloads

<table><thead><tr><th width="128.75">Date</th><th width="442.9609375">Version / Changes</th><th data-type="files">Files</th></tr></thead><tbody><tr><td>N.A.</td><td>N.A.</td><td></td></tr><tr><td></td><td></td><td></td></tr><tr><td></td><td></td><td></td></tr></tbody></table>


# FAQs


# DIR-BE3602

## Datasheet

{% file src="/files/hSnssZ4EfRdrfSRZuzca" %}

## Downloads/FAQ

{% columns %}
{% column width="50%" %}
{% content-ref url="/spaces/AsNvP4j1V0u2MDOjtqo2/pages/mOOqehTo4T9Cc7MhcQr9" %}
[Downloads](/consumer/wi-fi-7-multi-gigabit-router/dir-be3602/downloads)
{% endcontent-ref %}

{% endcolumn %}

{% column %}
{% content-ref url="/spaces/AsNvP4j1V0u2MDOjtqo2/pages/00z9wT6ptGXV3ZnTVr7z" %}
[FAQs](/consumer/wi-fi-7-multi-gigabit-router/dir-be3602/faqs)
{% endcontent-ref %}

{% endcolumn %}
{% endcolumns %}

***


# Downloads

<table><thead><tr><th width="128.75">Date</th><th width="442.9609375">Version / Changes</th><th data-type="files">Files</th></tr></thead><tbody><tr><td>8/11/2025</td><td>B1</td><td><a href="/files/ThTTtxy7im0brchZS29d">/files/ThTTtxy7im0brchZS29d</a></td></tr><tr><td></td><td></td><td></td></tr><tr><td></td><td></td><td></td></tr></tbody></table>


# FAQs

{% content-ref url="/spaces/AsNvP4j1V0u2MDOjtqo2/pages/BkrMbuHVYX1Do79Cigtz" %}
[How Do I access the Web Configuration Page of my D-Link DIR-BE3602?](/consumer/wi-fi-7-multi-gigabit-router/dir-be3602/faqs/how-do-i-access-the-web-configuration-page-of-my-d-link-dir-be3602)
{% endcontent-ref %}

{% content-ref url="/spaces/AsNvP4j1V0u2MDOjtqo2/pages/dK3enEBJJLhrsTPffC5a" %}
[How to Setup my D-Link DIR-BE3602 router via the Web Interface?](/consumer/wi-fi-7-multi-gigabit-router/dir-be3602/faqs/how-to-setup-my-d-link-dir-be3602-router-via-the-web-interface)
{% endcontent-ref %}

{% content-ref url="/spaces/AsNvP4j1V0u2MDOjtqo2/pages/IuNfsSLvBtLaZBVI8TOE" %}
[How to manually update the firmware on my D-Link DIR-BE3602 router?](/consumer/wi-fi-7-multi-gigabit-router/dir-be3602/faqs/how-to-manually-update-the-firmware-on-my-d-link-dir-be3602-router)
{% endcontent-ref %}

{% content-ref url="/spaces/AsNvP4j1V0u2MDOjtqo2/pages/kOZG5kVP2R9sk01lPVCT" %}
[How to Factory Reset my D-Link DIR-BE3602 Router?](/consumer/wi-fi-7-multi-gigabit-router/dir-be3602/faqs/how-to-factory-reset-my-d-link-dir-be3602-router)
{% endcontent-ref %}

{% content-ref url="/spaces/AsNvP4j1V0u2MDOjtqo2/pages/EyUQYk7Z02spLxiqfXxL" %}
[How to change the Wireless Name (SSID) and Password  of DIR-BE3602 Router?](/consumer/wi-fi-7-multi-gigabit-router/dir-be3602/faqs/how-to-change-the-wireless-name-ssid-and-password-of-dir-be3602-router)
{% endcontent-ref %}


# How Do I access the Web Configuration Page of my D-Link DIR-BE3602?

You can access the router’s web configuration page using a computer, smartphone, or tablet connected to your network. The web interface allows you to change Wi-Fi settings, update firmware, and manage advanced features.

{% stepper %}
{% step %}
**Connect to the Router**

You can connect in one of two ways:&#x20;

* **Wired connection:** \
  Plug your computer into one of the router’s LAN (Ethernet) ports using a network cable.&#x20;
* **Wireless connection:** \
  Connect your device to the router’s Wi-Fi network.&#x20;

Default Wi-Fi Name (SSID) and Password are printed on the product label under the router.
{% endstep %}

{% step %}
**Open a Web Browser**

* Open any web browser (such as Chrome, Edge, Firefox, or Safari)
* In the address bar, type **192.168.0.1** or **<http://dlinkrouter.local>** and press **Enter**
  {% endstep %}

{% step %}
**Log In to the Web Interface**

* The login screen will appear
* Enter your administrator’s credentials
  * Username: **admin**
  * Password: ***(refer to the product label)***

<figure><img src="/files/RzBUfkxXuCgo0MD97o14" alt=""><figcaption><p>Note: If you have not changed the admin password yet, leave the password field blank or use the default printed on the router label.</p></figcaption></figure>
{% endstep %}

{% step %}
**Access Router Settings**

After logging in, you’ll see the main dashboard with tabs such as Home, Network, Wi-Fi, LAN, Mesh, and More.\
From here, you can manage:

* Wi-Fi name and password
* Internet and LAN settings
* Firmware updates
* Parental controls and security features

<figure><img src="/files/RoiSjWWLYcAUQyqx84Gs" alt=""><figcaption></figcaption></figure>
{% endstep %}
{% endstepper %}

**Troubleshooting Tips**

* If the login page doesn’t open:
  * Ensure your device is connected to the router’s network
  * Try a different browser or clear your browser cache
  * o If still unable to access, **reset the router** to factory defaults by holding the Reset button for 10–15 seconds.


# How to Setup my D-Link DIR-BE3602 router via the Web Interface?

You can set up your D-Link **DIR-BE3602** router using any web browser on your computer, smartphone, or tablet.&#x20;The Web Interface allows you to configure your Internet connection, Wi-Fi name, and password easily without using any app.

{% stepper %}
{% step %}
**Connect to the Router**

* Power on your router and wait for the LED indicator to turn solid
* Connect your computer or mobile device to the router:
  * Via **Wi-Fi**. Use the default **SSID** and **Wi-Fi password** printed on the sticker at the bottom of the router
  * Via **Ethernet**. Plug your computer into one of the router’s LAN ports using a network cable
    {% endstep %}

{% step %}
**Open the Web Interface**

* Open a **web browser** (Chrome, Edge, Firefox, or Safari)
* Type **192.168.0.1** or **<http://dlinkrouter.local>** in the address bar and press Enter
* The **Setup Wizard** page will appear automatically when you first log in
* If prompted, create a new **admin password** for your router
  {% endstep %}

{% step %}
**Follow the Setup Wizard**

The Setup Wizard will guide you through several steps:

* **Internet Connection Setup**
  * The router will automatically detect your Internet connection type (Dynamic IP, PPPoE, Static IP, etc.)
  * If not detected, select your connection type manually and enter the required details provided by your Internet Service Provider (ISP)

<figure><img src="/files/JgGCspQonrV3AyJDscOM" alt=""><figcaption></figcaption></figure>

* **Wi-Fi Settings**
  * Enter your preferred **Wi-Fi name (SSID)** and **Wi-Fi password**
  * You can enable **Wi-Fi Band Steering** to combine 2.4GHz and 5GHz under one SSID, or disable it to name each band separately

<figure><img src="/files/ogrHiMf0UToxWxBnwBNC" alt=""><figcaption></figcaption></figure>

* **Admin Password Setup**
  * Create a strong password to protect your router’s web interface
* **Time Zone**
  * Select your correct time zone for accurate system logs and scheduled operations
    {% endstep %}

{% step %}
**Save and Reboot**

* Review your settings on the summary page
* Click **Save** or **Apply**
* The router will reboot and apply your new settings
  {% endstep %}

{% step %}
**Connect to Your New Wi-Fi Network**

Once the router restarts:

* Reconnect your devices using the new **Wi-Fi name** and **password** you created
* You can now access the Internet and manage settings anytime via **<http://dlinkrouter.local>**
  {% endstep %}
  {% endstepper %}


# How to manually update the firmware on my D-Link DIR-BE3602 router?

Updating your router’s firmware helps improve performance, add new features, and enhance security. Follow the steps below to perform a manual firmware update.

{% stepper %}
{% step %}
**Download the Latest Firmware**

* Visit the official **D-Link Support Website**
* Search for your router model: **DIR-BE3602**
* Go to the **Downloads** or **Firmware** section
* Download the latest firmware file to your computer and extract it if it is in **ZIP** format

{% hint style="info" %}
Tip: Always make sure the firmware file matches your router’s hardware version (e.g., A1, A2). You can find the hardware version printed on the label under your router.
{% endhint %}
{% endstep %}

{% step %}
**Log in to the Router Interface**

* Connect your device to the router (via Wi-Fi or Ethernet cable)
* Open a web browser and go to **192.168.0.1** or **<http://dlinkrouter.local>**
* Log in using your admin credentials.
  * Username: **admin**
  * Password: ***(use the one you set during setup)***

<figure><img src="/files/B28Xqa1NyjKyJVEKKa0d" alt=""><figcaption></figcaption></figure>
{% endstep %}

{% step %}
**Go to the Firmware Update Section**

* From the top menu, click **More**

<figure><img src="/files/wBsHrTcffPWcntcVjdcD" alt=""><figcaption></figcaption></figure>

* Under **System Control**, click **Update**
* The page will show Local Update, FOTA Update, and Backup Configuration options
  {% endstep %}

{% step %}
**Upload the Firmware File**

* Under **Local Update**, make sure **Save Configuration** is checked if you want to keep your current settings. If you prefer a clean install, uncheck **Save Configuration**
* Click the **Update** button next to **Local Update**

<figure><img src="/files/IW43a1xKXRBGQFdMPNl7" alt=""><figcaption></figcaption></figure>

* A file selection window will appear
* Browse and select the firmware file you downloaded earlier (e.g., DIR-BE3602\_FW\_v1.xx.bin). Then, Click **Open** to start the update

{% hint style="info" %}
*Important:*&#x20;

* *Do not power off or unplug the router during the firmware update process.*&#x20;
* *The update may take several minutes to complete.*
  {% endhint %}
  {% endstep %}

{% step %}
**Wait for the Router to Reboot**

* Once the update is completed, the router will automatically restart.
* After reboot, log in again and verify the Current Version under FOTA Update to ensure the firmware has been successfully updated
  {% endstep %}
  {% endstepper %}


# How to Factory Reset my D-Link DIR-BE3602 Router?

If you experience login issues or need to restore the router to its original settings, you can perform a factory reset. This will erase all customized settings, including Wi-Fi names, passwords, and a

If you experience login issues or need to restore the router to its original settings, you can perform a factory reset. This will erase all customized settings, including Wi-Fi names, passwords, and admin credentials.

**Option 1: Reset Using the Reset Button**

{% stepper %}
{% step %}
Locate the **Reset** button

* You’ll find a small RESET button on the back or bottom panel of your DIR-BE3602 router.

<figure><img src="/files/LYdVvv2WC0BLx2nrzgi7" alt=""><figcaption></figcaption></figure>
{% endstep %}

{% step %}
Press and hold the **Reset** button

* Use an unfolded paperclip or pin to press and hold the RESET button for about 10–15 seconds until the router’s LED indicator starts blinking.
  {% endstep %}

{% step %}
Wait for the router to **reboot**

* The router will automatically restart. Once the LED turns solid, the reset is complete.
  {% endstep %}
  {% endstepper %}

Note: After resetting, your router’s settings will return to factory defaults.&#x20;

* Default IP address: **192.168.0.1**&#x20;
* Default username: **admin**
* Default password: ***(refer to the router’s label located at the back)***

**Option 2: Reset Through the Web Interface**

If you can still log in to the router’s web configuration page, you can reset it from there.

{% stepper %}
{% step %}
Connect to the router via Wi-Fi or Ethernet cable
{% endstep %}

{% step %}
Open a web browser and go to **192.168.0.1** or **<http://dlinkrouter.local>**
{% endstep %}

{% step %}
Log in using your admin credentials.

<figure><img src="/files/9Pi6VIMlshBPhFuut0tx" alt=""><figcaption></figcaption></figure>
{% endstep %}

{% step %}
Go to **More** → **System Control**

<figure><img src="/files/vq3AudeQumpESddqdfha" alt=""><figcaption></figcaption></figure>
{% endstep %}

{% step %}
Click **Reset**

<figure><img src="/files/4qqH3mybUZoY41AbCmh6" alt=""><figcaption></figcaption></figure>
{% endstep %}

{% step %}
Click **Confirm** when prompted

<figure><img src="/files/93YGAbHLgNBXG6AusRSh" alt=""><figcaption></figcaption></figure>
{% endstep %}

{% step %}
The router will restart, and all settings will be restored to factory defaults.
{% endstep %}
{% endstepper %}

**After the Reset**

Once the router restarts:&#x20;

* Reconnect to the default Wi-Fi name (SSID) shown on the router label.&#x20;
* Log in again using admin as the username.&#x20;
* Reconfigure your Wi-Fi settings, Internet connection, and admin password.


# How to change the Wireless Name (SSID) and Password  of DIR-BE3602 Router?

{% stepper %}
{% step %}
**Log in to the Router**

* Connect your device (computer, phone, or tablet) to the router via Wi-Fi of the DIR-BE3602 or Ethernet cable to the LAN port of the router.
* Open a web browser and type **192.168.0.1** or **<http://dlinkrouter.local>** in the address bar, then press **Enter**
* Log in using your **Admin** credentials. (Default username: **admin**. Password is the one you set during setup)

<figure><img src="/files/tNQQ6KZEIiwPsDRDGT07" alt=""><figcaption></figcaption></figure>
{% endstep %}

{% step %}
**Go to Wi-Fi Settings**

* On the top menu, click the **Wi-Fi** tab

<figure><img src="/files/lEvjlwn1MiGxbE7BaBL1" alt=""><figcaption></figcaption></figure>
{% endstep %}

{% step %}
**Change the SSID and Password**

* In the Wi-Fi Settings section:
  * Find the field labeled **SSID** — this is your Wi-Fi network name
    * Enter your preferred name
  * In the **Wi-Fi Password** field, type your new desired password
    * Make sure it’s at least 8 characters long and includes a mix of letters and numbers for better security

<figure><img src="/files/vbuLfTd2wq0fn9W5JdYs" alt=""><figcaption><p><em>(Optional) To use separate names for 2.4GHz and 5GHz bands, turn off the Wi-Fi Band Steering Switch at the top, then edit each band’s SSID and password individually.</em></p></figcaption></figure>
{% endstep %}

{% step %}
**Save the Settings**

* Scroll down and click **Save** or **Apply** to confirm the changes.

<figure><img src="/files/uJhY1LayUr5TfV4OwcZj" alt=""><figcaption></figcaption></figure>

* Your router will update the settings. You may need to reconnect your devices using the new **Wi-Fi name** and **password**
  {% endstep %}
  {% endstepper %}


# DPN-BE7200GR

## Specs & Guides

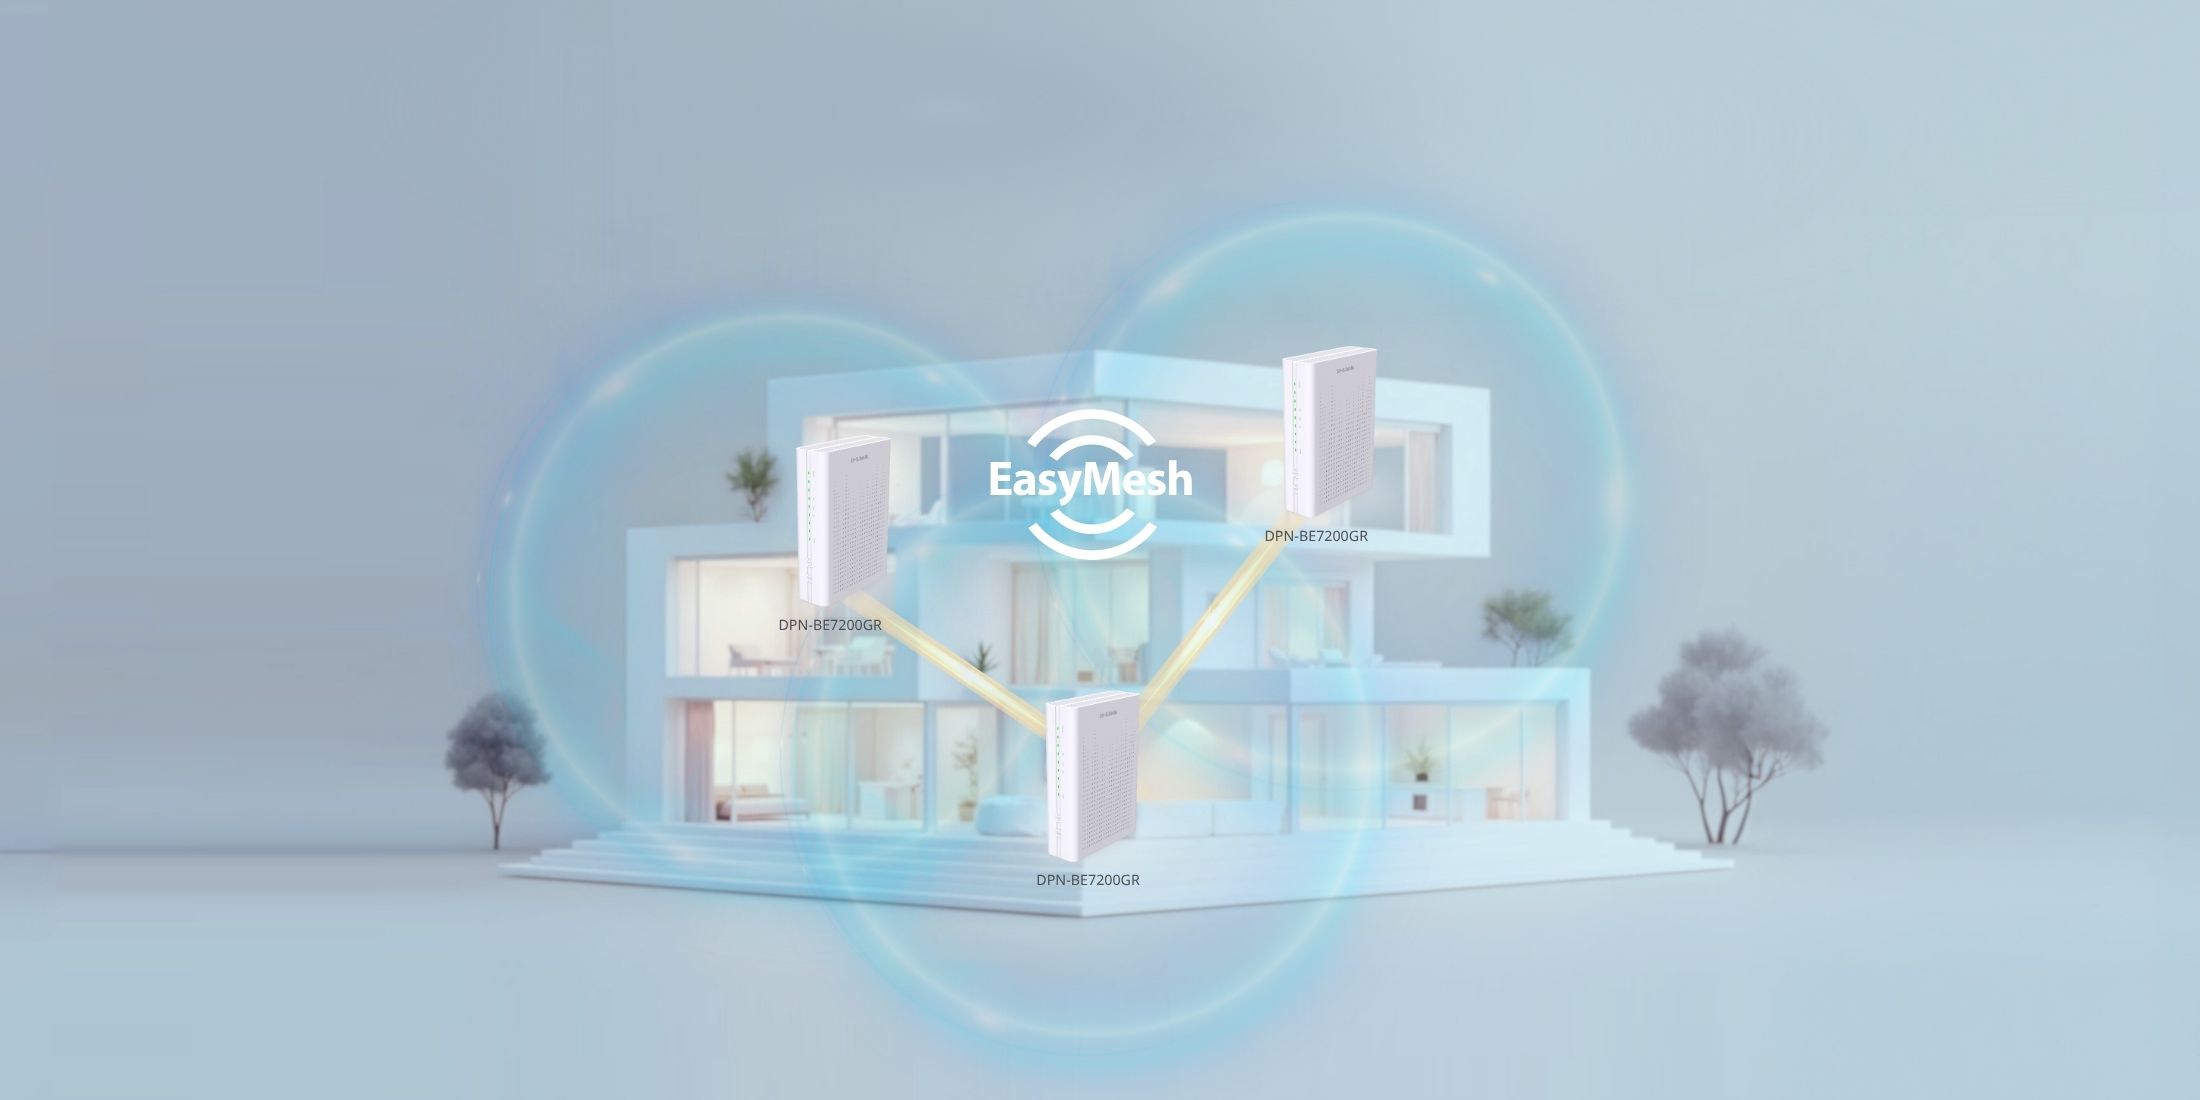
<table data-view="cards"><thead><tr><th></th><th data-type="files"></th><th data-type="content-ref"></th><th data-hidden data-card-cover data-type="image">Cover image</th><th data-hidden data-type="image">Cover image</th></tr></thead><tbody><tr><td>DPN-BE7200GR Datasheet</td><td><a href="/files/pW0Vau9VOtGQ8qH7zYTC">/files/pW0Vau9VOtGQ8qH7zYTC</a></td><td></td><td data-object-fit="contain"><a href="/files/jCPJTR8pOs2set2STtaY">/files/jCPJTR8pOs2set2STtaY</a></td><td><a href="/files/6ScgSvhBC0JJCFe9fiBg">/files/6ScgSvhBC0JJCFe9fiBg</a></td></tr><tr><td>Quick Installation Guide</td><td><a href="/files/vQ76vd3yZoh6UQcf5C0L">/files/vQ76vd3yZoh6UQcf5C0L</a></td><td></td><td data-object-fit="contain"><a href="/files/iFxK3tTAsLyTAY04pjeX">/files/iFxK3tTAsLyTAY04pjeX</a></td><td></td></tr><tr><td>How to setup Wi-Fi Mesh</td><td></td><td><a href="https://support.dlink.com.sg/consumer/wi-fi-7-multi-gigabit-router/dpn-be7200gr/faqs/how-to-setup-wi-fi-mesh-using-wired-wireless-method">https://support.dlink.com.sg/consumer/wi-fi-7-multi-gigabit-router/dpn-be7200gr/faqs/how-to-setup-wi-fi-mesh-using-wired-wireless-method</a></td><td data-object-fit="contain"><a href="/files/alUQX6IiorSnqZchl316">/files/alUQX6IiorSnqZchl316</a></td><td></td></tr></tbody></table>

## Downloads/FAQ

{% columns %}
{% column width="50%" %}
{% content-ref url="/spaces/AsNvP4j1V0u2MDOjtqo2/pages/8cDwM4ZsH2KeTKG8VQ8D" %}
[Downloads](/consumer/wi-fi-7-multi-gigabit-router/dpn-be7200gr/downloads)
{% endcontent-ref %}
{% endcolumn %}

{% column %}
{% content-ref url="/spaces/AsNvP4j1V0u2MDOjtqo2/pages/yPPJBuGOpZP0MblU7Wxr" %}
[FAQs](/consumer/wi-fi-7-multi-gigabit-router/dpn-be7200gr/faqs)
{% endcontent-ref %}
{% endcolumn %}
{% endcolumns %}

***


# Downloads

<table><thead><tr><th width="128.75">Date</th><th width="442.9609375">Version / Changes</th><th data-type="files">Files</th></tr></thead><tbody><tr><td>15/3/2026</td><td>2.06s</td><td><a href="/files/HRXyeWl9kFKn4qgJwjn9">/files/HRXyeWl9kFKn4qgJwjn9</a></td></tr><tr><td></td><td></td><td></td></tr><tr><td></td><td></td><td></td></tr></tbody></table>


# FAQs

{% content-ref url="/spaces/AsNvP4j1V0u2MDOjtqo2/pages/EYFrSzXpXhNcLV3zs4HP" %}
[How to setup Wi-Fi Mesh using Wired / Wireless Method](/consumer/wi-fi-7-multi-gigabit-router/dpn-be7200gr/faqs/how-to-setup-wi-fi-mesh-using-wired-wireless-method)
{% endcontent-ref %}

{% content-ref url="/spaces/AsNvP4j1V0u2MDOjtqo2/pages/XRy1zECbxLhPco0YJWmq" %}
[How to setup Wireless Mesh from WPS button](/consumer/wi-fi-7-multi-gigabit-router/dpn-be7200gr/faqs/how-to-setup-wireless-mesh-from-wps-button)
{% endcontent-ref %}

{% content-ref url="/spaces/AsNvP4j1V0u2MDOjtqo2/pages/LaQMxkUro7pHbU5z4Iiq" %}
[How to setup Mesh from Wired to Wireless Mesh](/consumer/wi-fi-7-multi-gigabit-router/dpn-be7200gr/faqs/how-to-setup-mesh-from-wired-to-wireless-mesh)
{% endcontent-ref %}

{% content-ref url="/spaces/AsNvP4j1V0u2MDOjtqo2/pages/4OaSLFBZgPe4dwC6Q3IF" %}
[How to Manually Upgrade Firmware](/consumer/wi-fi-7-multi-gigabit-router/dpn-be7200gr/faqs/how-to-manually-upgrade-firmware)
{% endcontent-ref %}

{% content-ref url="/spaces/AsNvP4j1V0u2MDOjtqo2/pages/u6dRoeOthGVCD9oBFUgk" %}
[How to install the DPN-BE7200GR Wi-Fi 7 Router via web GUI](/consumer/wi-fi-7-multi-gigabit-router/dpn-be7200gr/faqs/how-to-install-the-dpn-be7200gr-wi-fi-7-router-via-web-gui)
{% endcontent-ref %}

{% content-ref url="/spaces/AsNvP4j1V0u2MDOjtqo2/pages/bTzLBIkKCQuPZc61skFC" %}
[How to reset DPN-BE7200GR to its factory default settings](/consumer/wi-fi-7-multi-gigabit-router/dpn-be7200gr/faqs/how-to-reset-dpn-be7200gr-to-its-factory-default-settings)
{% endcontent-ref %}

{% content-ref url="/spaces/AsNvP4j1V0u2MDOjtqo2/pages/FbqMOmqyMVgEEXzDua2f" %}
[How to configure the wireless network name and password on DPN-BE7200GR](/consumer/wi-fi-7-multi-gigabit-router/dpn-be7200gr/faqs/how-to-configure-the-wireless-network-name-and-password-on-dpn-be7200gr)
{% endcontent-ref %}


# How to setup Wi-Fi Mesh using Wired / Wireless Method

<figure><img src="/files/kQFizbBLBo9SUuX1WKLb" alt=""><figcaption></figcaption></figure>

### How to setup Wired Mesh using DPN-BE7200GR (Network Cable Connection)

{% stepper %}
{% step %}
Power on both DPN-BE7200GR Router
{% endstep %}

{% step %}
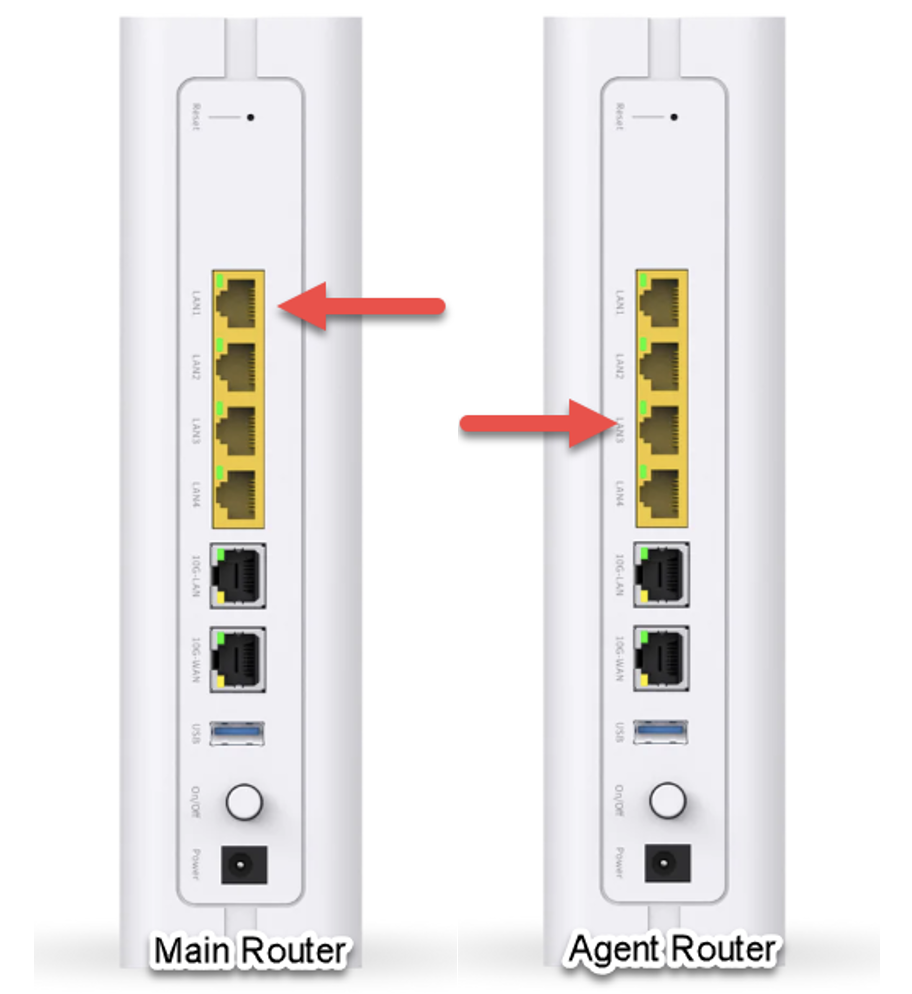
Plug the Ethernet Cable from Main Router’s LAN Port (1G/10G)   to the 2nd Router’s (Agent Router) LAN Port (1G/10G)

<figure><img src="/files/9Y6axtULl1CPhnLZdL5U" alt="" width="375"><figcaption></figcaption></figure>
{% endstep %}

{% step %}
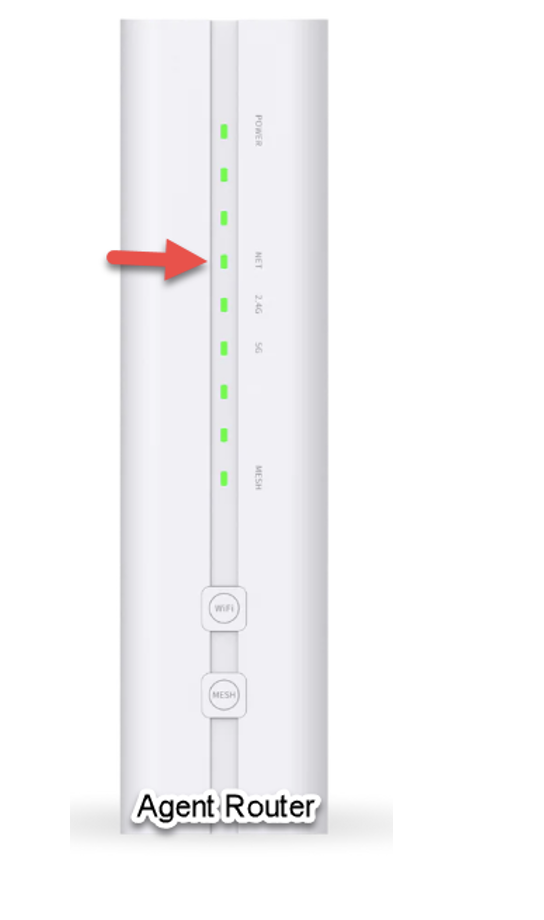
Wait for the "NET" indicator to turn green on the Agent Router. A green "NET" indicator confirms the router is operating in Wired Mesh mode. (Please use the "NET" indicator to verify mesh status, not the "MESH" indicator)

<figure><img src="/files/5L0Mnqma2kWM4GRwwcav" alt="" width="251"><figcaption></figcaption></figure>
{% endstep %}
{% endstepper %}

### How to setup Wireless Mesh using DPN-BE7200GR (Mesh Button)

{% stepper %}
{% step %}
Power on both DPN-BE7200GR Router       &#x20;
{% endstep %}

{% step %}
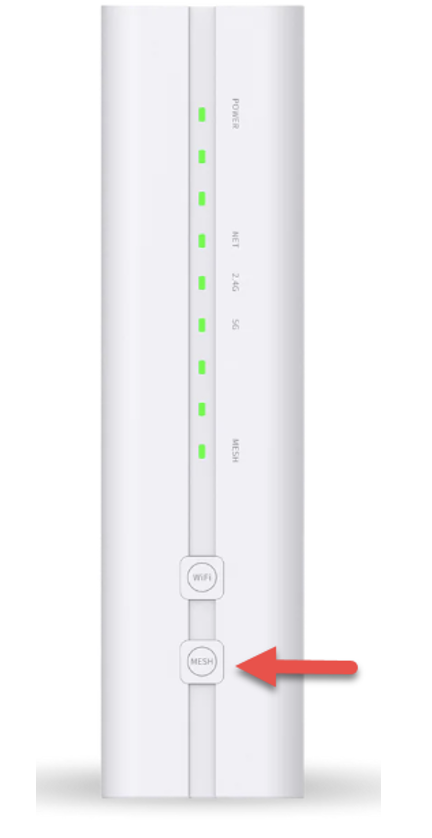
Press the “MESH” button on the Main Router for more the 5 seconds.

<figure><img src="/files/AT2ljh0T9yr8Bqv1lXGD" alt="" width="216"><figcaption></figcaption></figure>
{% endstep %}

{% step %}
The Main Router “Mesh” light will start blinking.
{% endstep %}

{% step %}
Next, press the “MESH” button on the Agent Router for more the 5 seconds
{% endstep %}

{% step %}
Wait for the "NET" indicator to turn green on the Agent Router. A green "NET" indicator confirms the router is operating in Wireless Mesh mode. (Please use the "NET" indicator to verify mesh status, not the "MESH" indicator)

<figure><img src="/files/f1CMkZCFMmRSwgGVfX0f" alt="" width="272"><figcaption></figcaption></figure>

{% endstep %}
{% endstepper %}

&#x20;


# How to setup Wireless Mesh from WPS button

{% embed url="<https://youtu.be/VefNo14mQ8g>" %}


# How to setup Mesh from Wired to Wireless Mesh

{% embed url="<https://youtu.be/K3XwrYwHWIA>" %}


# How to configure the wireless network name and password on DPN-BE7200GR

{% stepper %}
{% step %}
Connect your computer, smartphone, or tablet to the router either via Wi-Fi or by using an Ethernet cable.&#x20;

{% hint style="info" %}
*<mark style="color:red;">Note: The default Wi-Fi name SSID is D-Link-XXXX and Wi-Fi password printed on the bottom of the router.</mark>*
{% endhint %}

{% endstep %}

{% step %}
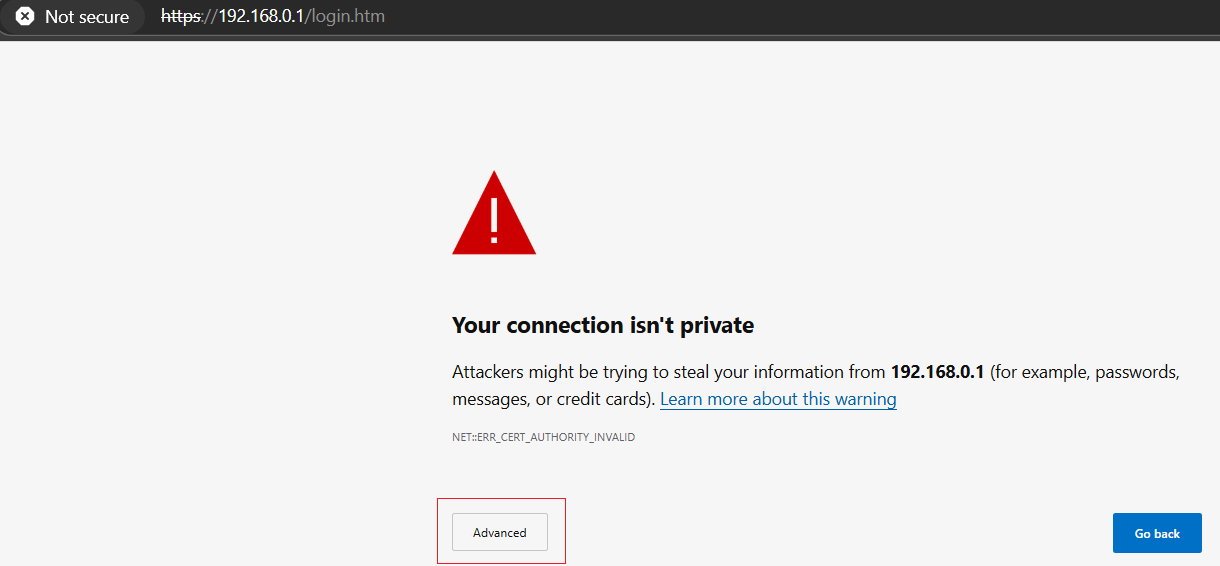
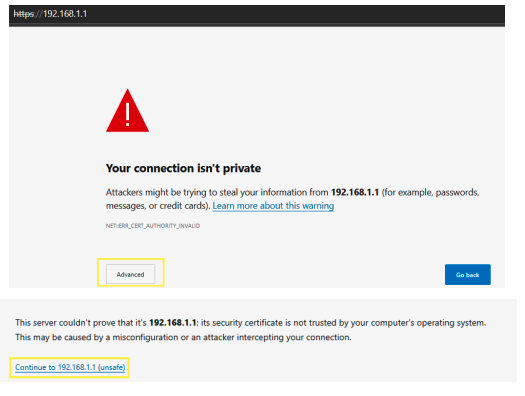
Once connected, open a web browser and type in the URL bar <https://192.168.0.1> and hit enter.&#x20;

{% hint style="info" %}
*<mark style="color:red;">Note: You might see a "Privacy Error" or similar security warning. This happens because the router uses a self-signed SSL certificate, which browsers may not recognize as secure. It is safe to proceed on.</mark>*
{% endhint %}

Here's how to proceed:&#x20;

1. Click on Advanced at the bottom of the warning page.&#x20;
2. Then, select Continue to 192.168.0.1 (unsafe) to access the router's login page. If you’re hesitant to proceed due to security concerns, you can review the certificate details to verify its issuer and confirm that it is associated with D-Link. To do this:
3. Click the "Not Secure" icon or the padlock symbol (depending on your browser).&#x20;
4. View the certificate details to confirm it was issued by the D-Link manufacturer

<figure><img src="/files/qXgkpfMWlCYBhyII2UGu" alt=""><figcaption></figcaption></figure>
{% endstep %}

{% step %}
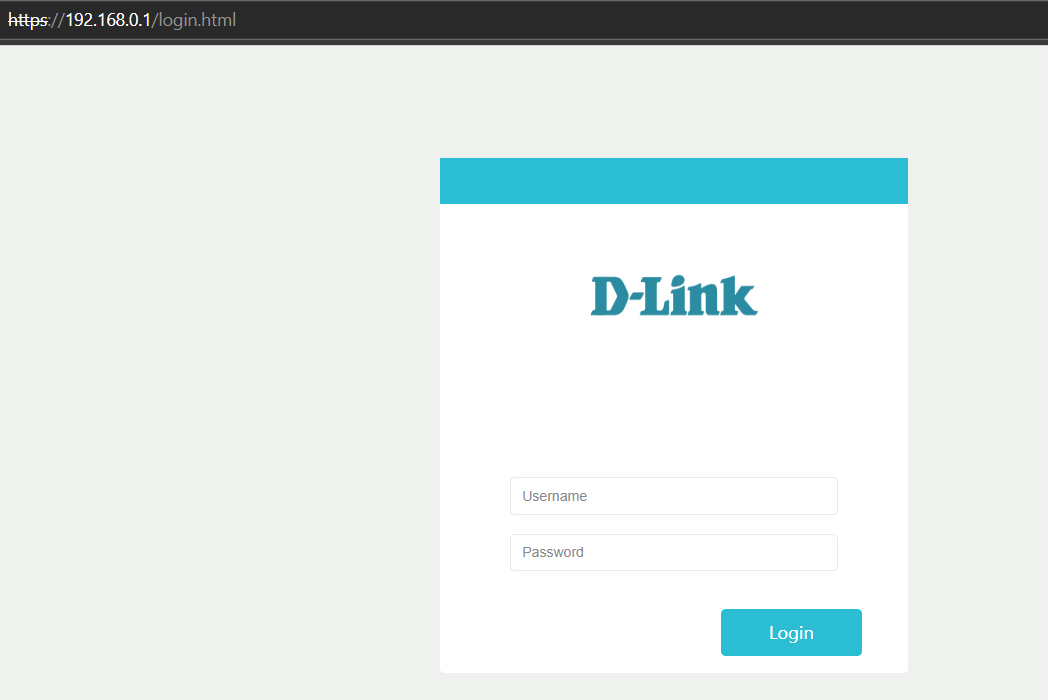
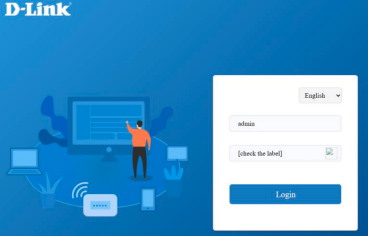
You will be prompted to enter the username and password to access the router’s settings.&#x20;

Username <mark style="background-color:yellow;">**admin**</mark> \
Password <mark style="background-color:yellow;">\[device password found on the label]</mark>

<figure><img src="/files/Tq3aVqW7QQ1VXTs4Ta1q" alt=""><figcaption></figcaption></figure>

{% hint style="info" %}
*<mark style="color:red;">Note: If you've forgotten the password, you can press the Reset button at the back of the router for 10 seconds to restore the router to its factory default settings, allowing you to reset the password.</mark>*
{% endhint %}
{% endstep %}

{% step %}
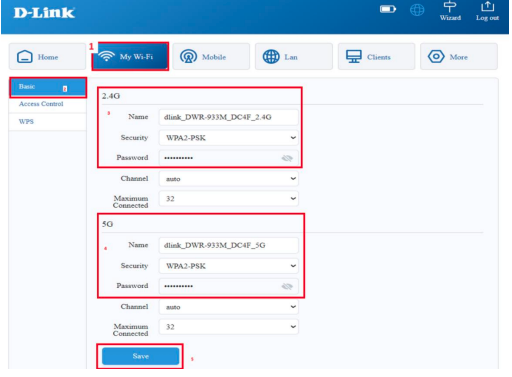
Once logged in, navigate to the Basic tab, and click on WLAN Settings. Choose which network's name and password you want to change.&#x20;

{% endstep %}

{% step %}
Choose 2.4G SSID or 5G SSID (if needed). Replace the "SSID name" with your new WiFi name&#x20;

{% endstep %}

{% step %}
Go to the WPA Pre-Shared key field. First, remove the current password (you can reveal it by checking the Display Key box). Then, enter the new password you want to use.&#x20;

{% endstep %}

{% step %}
Hit Save/Apply to confirm the settings.

<figure><img src="/files/jsg6NwOiphefwxJWDaKY" alt=""><figcaption></figcaption></figure>
{% endstep %}

{% step %}
Reconnect your devices to Wi-Fi with the new name and password.

{% endstep %}
{% endstepper %}


# How to Manually Upgrade Firmware

{% stepper %}
{% step %}
Obtain the latest software image version (um\_DPN-BE7200GR\_xxxx.bin format) from D-Link web site.

{% hint style="info" %}
*<mark style="color:red;">Note:</mark>* [*<mark style="color:red;">https://support.dlink.com.sg/consumer/wi-fi-7-multi-gigabit-router/dpn-be7200gr/downloads</mark>*](https://support.dlink.com.sg/consumer/wi-fi-7-multi-gigabit-router/dpn-be7200gr/downloads)
{% endhint %}

{% endstep %}

{% step %}
Connect your computer to the router either via Wi-Fi or by using an Ethernet cable..&#x20;

{% hint style="info" %}
*<mark style="color:$danger;">**⚠ Important:**</mark> <mark style="color:$danger;"></mark><mark style="color:$danger;">A wired connection is advised to prevent interruptions during the update process</mark>*
{% endhint %}

{% endstep %}

{% step %}
Once connected, open a web browser and type in the URL bar <https://192.168.0.1> and hit enter.&#x20;

{% hint style="info" %}
*<mark style="color:red;">Note: You might see a "Privacy Error" or similar security warning. This happens because the router uses a self-signed SSL certificate, which browsers may not recognize as secure. It is safe to proceed on.</mark>*
{% endhint %}

Here's how to proceed:

\
•Click on Advanced at the bottom of the warning page.\
•Then, select Continue to 192.168.0.1 (unsafe) to access the router's login page.

If you’re hesitant to proceed due to security concerns, you can review the certificate details to verify its issuer and confirm that it is associated with D-Link. To do this:

\
•Click the "Not Secure" icon or the padlock symbol (depending on your browser).\
•View the certificate details to confirm it was issued by the D-Link manufacturer<br>

<figure><img src="/files/h5EbxoNJPCzyEIojQUHN" alt=""><figcaption></figcaption></figure>

<figure><img src="/files/uZiYt1bppbiRlzzxHe3U" alt=""><figcaption></figcaption></figure>
{% endstep %}

{% step %}
Enter your admin username & password in their corresponding fields and click Login. The default username and password are printed on the router’s label at the bottom of the router. If you've set your own password, use that. Once entered, click Login to proceed.

<figure><img src="/files/9Fn7ZJ5PkUFwwxkIblo3" alt=""><figcaption></figcaption></figure>

{% hint style="info" %}
*<mark style="color:$danger;">Note:</mark>* <mark style="color:$danger;"></mark><mark style="color:$danger;">If you've forgotten the password, you can press the Reset button at the back of the router for 10 seconds to restore the router to its factory default settings, allowing you to reset the password.</mark>
{% endhint %}

{% endstep %}

{% step %}
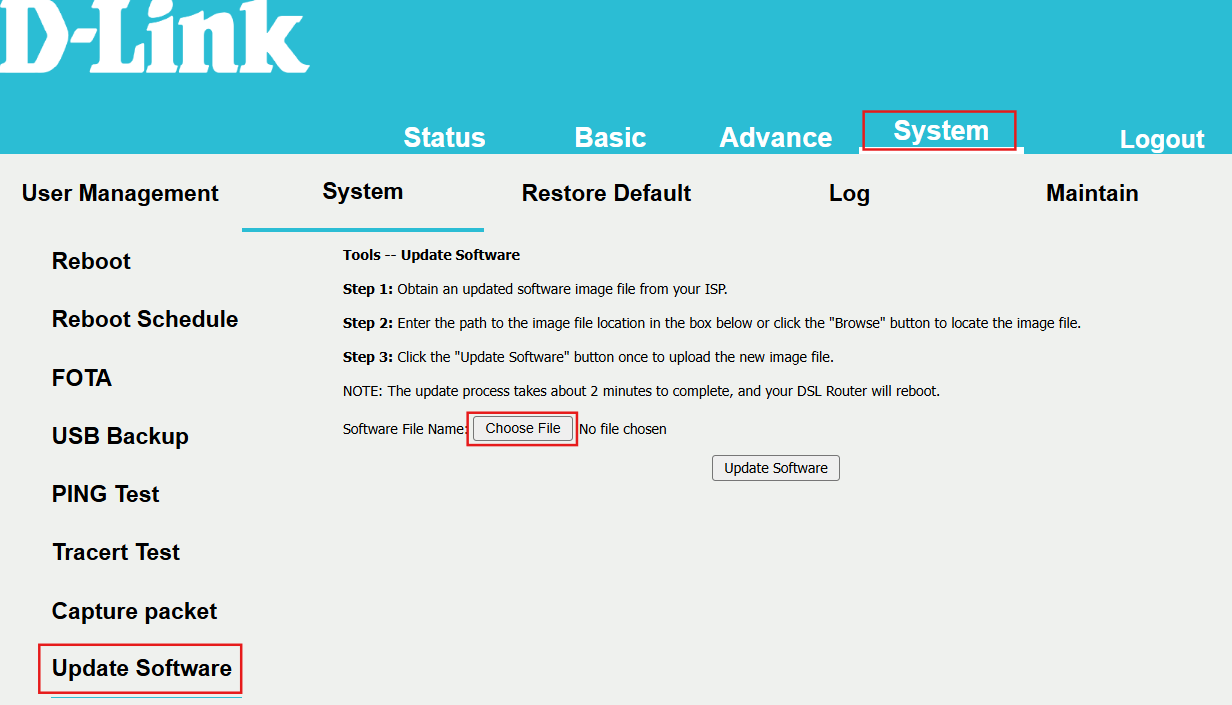
Once logged in, go to the System tab, and click on Update Software. Select Choose File and locate firmware file you downloaded on Step 1

<figure><img src="/files/Ymt6j3M2jxv0QU9To3xH" alt=""><figcaption></figcaption></figure>
{% endstep %}

{% step %}
Click the **Update Software** button once to upload the new image file.\
Note: The update process takes about 2 minutes to complete, and your DSL Router will reboot.

{% endstep %}
{% endstepper %}


# How to install the DPN-BE7200GR Wi-Fi 7 Router via web GUI

{% stepper %}
{% step %}
If your internet connection is through an Ethernet cable from the wall instead of through an XDSL / Cable / PON modem, connect the Ethernet cable directly to the router's WAN port.

{% endstep %}

{% step %}
Connect your computer, smartphone, or tablet to the router either via Wi-Fi or using an Ethernet cable.

{% hint style="info" %}
*<mark style="color:red;">The default Wi-Fi password is printed on the label at the bottom of the router.</mark>*
{% endhint %}
{% endstep %}

{% step %}
Once connected, open a web browser and type in the URL bar <https://192.168.0.1> and hit enter.

{% hint style="info" %}
*<mark style="color:red;">Note: You might see a "Privacy Error" or similar security warning. This happens because the router uses a self-signed SSL certificate, which browsers may not recognize as secure. It is safe to proceed on.</mark>*
{% endhint %}

<mark style="background-color:orange;">**Here's how to proceed:**</mark>

1. Click on Advanced at the bottom of the warning page.&#x20;
2. Then, select Continue to 192.168.0.1 (unsafe) to access the router's login page.

<mark style="background-color:orange;">**If you’re hesitant to proceed due to security concerns, you can review the certificate details to verify its issuer and confirm that it is associated with D-Link.**</mark>&#x20;

<mark style="background-color:$warning;">**To do this:**</mark>

1. Click the "Not Secure" icon or the padlock symbol (depending on your browser).
2. View the certificate details to confirm it was issued by the D-Link manufacturer

   <figure><img src="/files/DJtPfmPtJvqmc8aJ06tM" alt=""><figcaption></figcaption></figure>

   <figure><img src="/files/Jss8EBAehykv147jDdSG" alt=""><figcaption></figcaption></figure>

{% endstep %}

{% step %}
Enter your admin username & password in their corresponding fields and click Login. The default username and password are printed on the router’s label at the bottom of the router. If you've set your own password, use that. Once entered, click Login to proceed.

<figure><img src="/files/04i7mGgN93CW0PzIE6F7" alt=""><figcaption></figcaption></figure>

{% hint style="info" %}
*<mark style="color:red;">Note: If you've forgotten the password, you can press the Reset button at the back of the router for 10 seconds to restore the router to its factory default settings, allowing you to reset the password.</mark>*
{% endhint %}
{% endstep %}

{% step %}
Once you login to the router, you will see your current status of the router.

<figure><img src="/files/hIEJBtNrlwKJq2KjJpUw" alt=""><figcaption></figcaption></figure>

{% endstep %}

{% step %}
To start configuring the internet of the router, please select "Basic" then select “WAN” on the left-hand side.

**For PPPoE:**&#x20;

* Connection Mode: IPv4 / PPPoE&#x20;
* MTU: 1492&#x20;
* MVLAN: -1 (typically left as -1 unless specified by your ISP)&#x20;
* VLAN ID: Enter the VLAN ID provided by your ISP. If no VLAN is required, enter -1 (VLAN is disabled).&#x20;

{% hint style="info" %}
*<mark style="color:red;">Note: Range: 1-4095, -1 (indicates VLAN is disabled)</mark>*
{% endhint %}

* PPPoE Account: Enter the PPPoE Account provided by your ISP.
* PPPoE Password: Enter the PPPoE Password provided by your ISP.
*

```
<figure><img src="/files/ocSM6YhF9JHCOufbEp3D" alt=""><figcaption></figcaption></figure>
```

* Click Save/Apply at the bottom of the page.

  <figure><img src="/files/tyqd7kQFyOY0s2a2g88N" alt=""><figcaption></figcaption></figure>

**For Dynamic IP** (most common for cable or fiber ISPs):

* Connection mode: IPv4 / IPoE&#x20;
* Select DHCP in the IPv4 address access mode&#x20;
* MTU: 1500&#x20;
* MVLAN: -1 (typically left as -1 unless specified by your ISP)&#x20;
* Enable NAT&#x20;
* VLAN ID: Enter the VLAN ID provided by your ISP. If no VLAN is required, enter -1 (VLAN is disabled).&#x20;

{% hint style="info" %}
*<mark style="color:red;">Note: ▪ Range: 1-4095, -1 (indicates VLAN is disabled)</mark>*
{% endhint %}

* Click Save/Apply
*

```
<figure><img src="/files/3jo41PJ2mTGvHnDEgD2q" alt=""><figcaption></figcaption></figure>
```

\
\
\
\
\ <br>
{% endstep %}
{% endstepper %}


# How to reset DPN-BE7200GR to its factory default settings

**Hardware RESET**

{% stepper %}
{% step %}
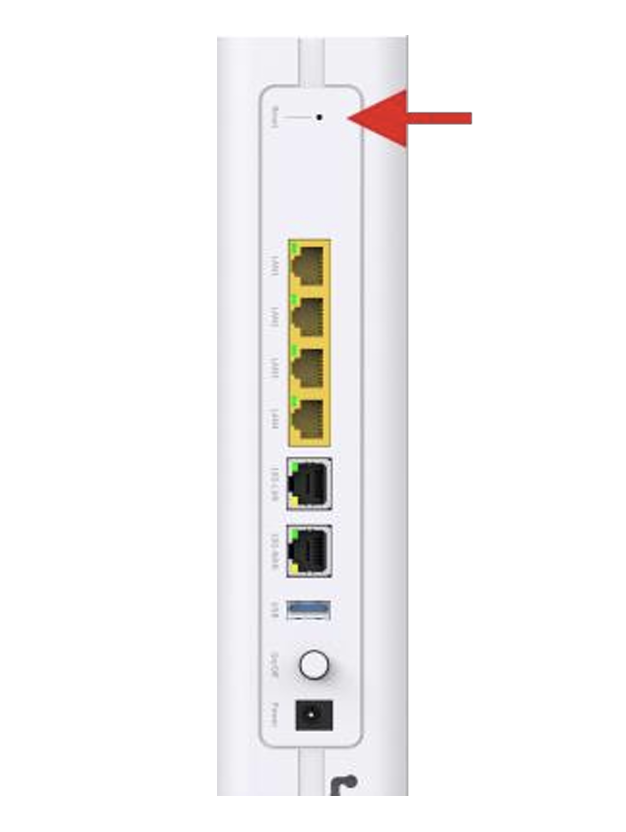
Use a straightened paperclip or a SIM ejector tool to press the RESET hole at the back of the DPN-7200GR device while it is powered on.
<figure><img src="/files/CzSkAih2xBpkCH5xKwrC" alt="" width="313"><figcaption></figcaption></figure>

{% endstep %}

{% step %}
Press and hold for 10 seconds, then release.

{% endstep %}

{% step %}
All LED’s will briefly turn off. When it is back on, the power LED will first come up on solid green. Then, all other LED’s will follow. This indicates that the device has been restored to its factory default settings.

{% endstep %}
{% endstepper %}

**Software RESET**

{% stepper %}
{% step %}
Open a web browser on your computer and type in the address bar: <https://192.168.0.1>

{% hint style="info" %}
*<mark style="color:red;">Note: You might see a "Privacy Error" or similar security warning. This happens because the router uses a self-signed SSL certificate, which browsers may not recognize as secure. It is safe to proceed on.</mark>*
{% endhint %}
{% endstep %}

{% step %}
After accessing the router management page, enter the device username & password in their corresponding fields and click Login. Note: (The default username & password are printed on the label on the bottom of the device. If you have forgotten your password, please refer to the hardware RESET steps).

{% endstep %}

{% step %}
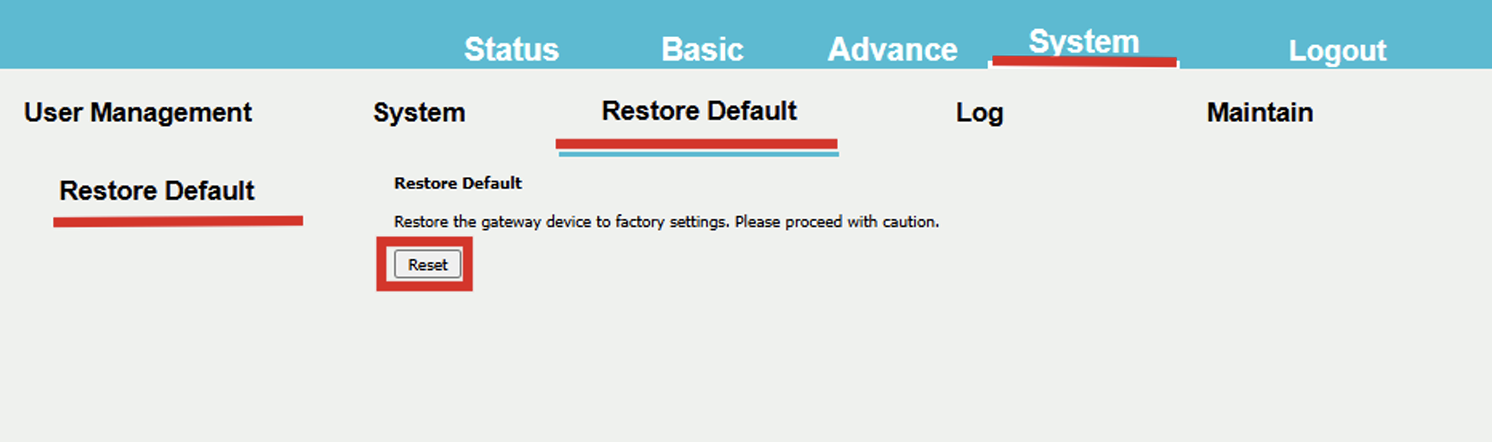
After logging in, click on System tab, then select Restore Default, and click Reset

<figure><img src="/files/NgzYgQCofJ8W5Lny69KU" alt=""><figcaption></figcaption></figure>
{% endstep %}

{% step %}
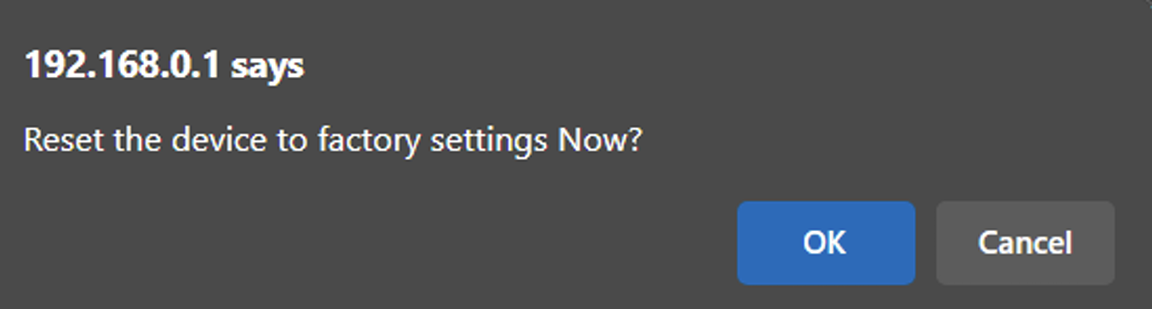
Click OK. Wait for the countdown timer to complete.

<figure><img src="/files/V8utdLuqksxqP77wQ6gD" alt=""><figcaption></figcaption></figure>

{% endstep %}
{% endstepper %}


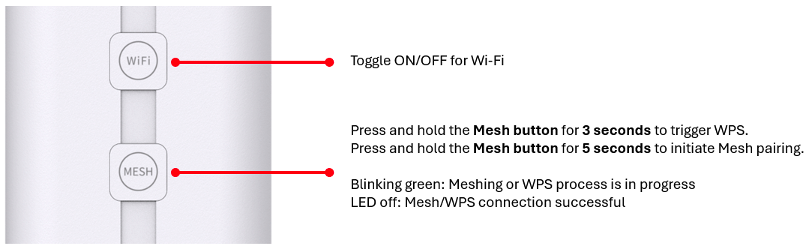
# DPN-BE7200GR WIFI & Mesh Button description

<figure><img src="/files/rsNOWxtILJJciYFNgjyc" alt=""><figcaption></figcaption></figure>


# Why can’t I set up Wireless Mesh using the Mesh button on the DPN-BE7200GR?

{% hint style="info" %} <mark style="color:$danger;">Note: In compliance with Singapore cybersecurity regulations, the WPS function is disabled by default to enhance network security. Since the Mesh button relies on WPS, it will not work unless WPS is enabled.</mark>

<mark style="color:$danger;">To proceed with Wireless Mesh setup, you must first enable WPS via the router’s web GUI.</mark>
{% endhint %}

<mark style="color:$danger;">**Important :**</mark> Ensure WPS is enabled on all routers \
(e.g., if you have two DPN-BE7200GR units, apply the steps below on both devices).

### **Steps to enable WPS**

{% stepper %}
{% step %}
Log in to the router via a web browser at 192.168.0.1&#x20;

{% hint style="info" %}
*<mark style="color:red;">Note: You might see a "Privacy Error" or similar security warning. This happens because the router uses a self-signed SSL certificate, which browsers may not recognize as secure. It is safe to proceed on.</mark>*
{% endhint %}

<figure><img src="/files/TiayOboghTwIwMpL05bh" alt=""><figcaption></figcaption></figure>

* Username: admin
* Password: Refer to the label at the bottom of the router (if unchanged)

<figure><img src="/files/BX9AtdaS3zJGxSMrm87u" alt=""><figcaption></figcaption></figure>

{% endstep %}

{% step %}
Navigate to the WPS settings page. Click on “Basic” -> “WLAN” -> “5G SSID”

<figure><img src="/files/9eE4lej4C2qtZiAcEW2M" alt=""><figcaption></figcaption></figure>

{% endstep %}

{% step %}
“Check/Tick” the box to enable WPS

<figure><img src="/files/K1hsjIHDsS6aE2w6jsG1" alt=""><figcaption></figcaption></figure>

<figure><img src="/files/EiM2csN3mzsH0qTbtzJB" alt=""><figcaption></figcaption></figure>
{% endstep %}

{% step %}
Repeat the above steps for all mesh routers.&#x20;
{% endstep %}

{% step %}
Once WPS enabled, press the “Mesh” Button on the Main Router for more than 5 seconds. After that, press “Mesh” Button on Agent Router for more than 5 seconds.
{% endstep %}

{% step %}
Wait for the “Net” indicator light turn to green on the Agent router. Then, the router have successful setup as wireless mesh.&#x20;
{% endstep %}
{% endstepper %}


# DPN-BE7200GR LED Indicator

Learn what the LED indicators on the D-Link DPN-BE7200GR Wi‑Fi 7 router mean and how to identify each front panel status light.

This DPN-BE7200GR LED indicator reference helps you understand the router status lights shown on the front panel.

Refer to the image below for the DPN-BE7200GR LED indicator layout and LED light description.

<figure><img src="/files/S9Ce0T2mKO2COwI97nqx" alt=""><figcaption></figcaption></figure>


# DPN-BE7212GR

## Datasheet

{% file src="/files/mKTu3bsKxQkd4OoHRrb8" %}

## Manual

{% file src="/files/eSWUvRQ5OTAitTCZ51wF" %}

## Downloads/FAQ

{% columns %}
{% column %}
{% content-ref url="/spaces/AsNvP4j1V0u2MDOjtqo2/pages/ri8CLZ6ayI0AFyqOVhBp" %}
[Downloads](/consumer/wi-fi-7-multi-gigabit-router/dpn-be7212gr/downloads)
{% endcontent-ref %}
{% endcolumn %}

{% column %}
{% content-ref url="/spaces/AsNvP4j1V0u2MDOjtqo2/pages/fXQEadMKYTIDC4qMHzYH" %}
[FAQs](/consumer/wi-fi-7-multi-gigabit-router/dpn-be7212gr/faqs)
{% endcontent-ref %}

{% endcolumn %}
{% endcolumns %}

## How to update firmware manually

{% embed url="<https://www.youtube.com/watch?v=VlGZobvY2WY>" %}

## How to setup Wired | Wireless Mesh

{% embed url="<https://youtu.be/-R4vkU0WN54?feature=shared>" %}

## How to setup Wireless Mesh using WPS

{% embed url="<https://youtu.be/zvVOr7rwQQI?feature=shared>" %}

***


# Downloads

{% hint style="info" %}
*Not sure how to update firmware manually? Check out the video guide* [***here***](https://support.dlink.com.sg/consumer/wi-fi-7-multi-gigabit-router/dpn-be7212gr/faqs/how-to-update-firmware-manually)***.***
{% endhint %}

<table data-full-width="false"><thead><tr><th width="127.1640625">Date</th><th width="97.14453125">Version</th><th width="351.97265625">Info</th><th data-type="files">⬇️ </th></tr></thead><tbody><tr><td>25 Apr 2025</td><td>1.15</td><td>DPN-BE7212GR Firmware</td><td><a href="/files/sgQoV6PWtpn911yEL9pM">/files/sgQoV6PWtpn911yEL9pM</a></td></tr><tr><td>09 Sep 2025</td><td>2.04</td><td>DPN-BE7212GR Firmware</td><td><a href="/files/iZsCcDnr6yZtYcZH98sA">/files/iZsCcDnr6yZtYcZH98sA</a></td></tr><tr><td>24 Nov 2025</td><td>2.05</td><td>DPN-BE7212GR Firmware</td><td><a href="/files/4VcemlpHpZohOuXYVpjC">/files/4VcemlpHpZohOuXYVpjC</a></td></tr><tr><td>26 Jan 2026</td><td>2.06</td><td>DPN-BE7212GR Firmware</td><td><a href="/files/LM7fQOvgLbfOG4bEEAkH">/files/LM7fQOvgLbfOG4bEEAkH</a></td></tr></tbody></table>


# FAQs

{% content-ref url="/spaces/AsNvP4j1V0u2MDOjtqo2/pages/l71jvBJYOiRtiGIW0OH0" %}
[How to update firmware manually](/consumer/wi-fi-7-multi-gigabit-router/dpn-be7212gr/faqs/how-to-update-firmware-manually)
{% endcontent-ref %}

{% content-ref url="/spaces/AsNvP4j1V0u2MDOjtqo2/pages/C0M9h3ma1bxy050jhMAs" %}
[How to setup Wired | Wireless Mesh](/consumer/wi-fi-7-multi-gigabit-router/dpn-be7212gr/faqs/how-to-setup-wired-or-wireless-mesh)
{% endcontent-ref %}

{% content-ref url="/spaces/AsNvP4j1V0u2MDOjtqo2/pages/4rursVMi4yHZdvZcGDG3" %}
[How to setup Wireless Mesh using WPS](/consumer/wi-fi-7-multi-gigabit-router/dpn-be7212gr/faqs/how-to-setup-wireless-mesh-using-wps)
{% endcontent-ref %}

{% content-ref url="/spaces/AsNvP4j1V0u2MDOjtqo2/pages/vPyVoMArIMck9Fl7qDuO" %}
[How to configure the wireless network name and password on DPN-BE7212GR](/consumer/wi-fi-7-multi-gigabit-router/dpn-be7212gr/faqs/how-to-configure-the-wireless-network-name-and-password-on-dpn-be7212gr)
{% endcontent-ref %}

{% content-ref url="/spaces/AsNvP4j1V0u2MDOjtqo2/pages/T5ptWM2AvvzAq0g3ia7w" %}
[How to install the DPN-BE7212GR Wi-Fi 7 Router via web GUI](/consumer/wi-fi-7-multi-gigabit-router/dpn-be7212gr/faqs/how-to-install-the-dpn-be7212gr-wi-fi-7-router-via-web-gui)
{% endcontent-ref %}

{% file src="/files/Ataxlaz87chInwoAONyq" %}

{% file src="/files/UJnh8SsLYkftrVDVcSFj" %}

{% content-ref url="/spaces/AsNvP4j1V0u2MDOjtqo2/pages/xGq8oLCoP6ICYH3j9wRE" %}
[How to reset DPN-BE7212GR to its factory default settings](/consumer/wi-fi-7-multi-gigabit-router/dpn-be7212gr/faqs/how-to-reset-dpn-be7212gr-to-its-factory-default-settings)
{% endcontent-ref %}


# How to update firmware manually

{% embed url="<https://www.youtube.com/watch?v=VlGZobvY2WY>" %}


# How to setup Wired | Wireless Mesh

<mark style="color:red;">\*If router has previously been configured for a mesh network, please perform a factory reset on the router before proceeding with setup.</mark>

{% embed url="<https://youtu.be/-R4vkU0WN54>" %}


# How to setup Wireless Mesh using WPS

<mark style="color:red;">\*If router has previously been configured for a mesh network, please perform a factory reset on the router before proceeding with setup.</mark>

{% embed url="<https://youtu.be/zvVOr7rwQQI>" %}


# How to configure the wireless network name and password on DPN-BE7212GR

{% stepper %}
{% step %}
Connect your computer, smartphone, or tablet to the router either via Wi-Fi or by using an Ethernet cable.&#x20;

{% hint style="info" %}
*<mark style="color:red;">Note: The default Wi-Fi name SSID is D-Link-XXXX and Wi-Fi password printed on the bottom of the router.</mark>*
{% endhint %}

{% endstep %}

{% step %}
Once connected, open a web browser and type in the URL bar <https://192.168.0.1> and hit enter.&#x20;

{% hint style="info" %}
*<mark style="color:red;">Note: You might see a "Privacy Error" or similar security warning. This happens because the router uses a self-signed SSL certificate, which browsers may not recognize as secure.</mark>*&#x20;
{% endhint %}

Here's how to proceed:&#x20;

1. Click on Advanced at the bottom of the warning page.&#x20;
2. Then, select Continue to 192.168.0.1 (unsafe) to access the router's login page. If you’re hesitant to proceed due to security concerns, you can review the certificate details to verify its issuer and confirm that it is associated with D-Link. To do this:
3. Click the "Not Secure" icon or the padlock symbol (depending on your browser).&#x20;
4. View the certificate details to confirm it was issued by the D-Link manufacturer

<figure><img src="/files/qXgkpfMWlCYBhyII2UGu" alt=""><figcaption></figcaption></figure>
{% endstep %}

{% step %}
You will be prompted to enter the username and password to access the router’s settings.&#x20;

Username <mark style="background-color:yellow;">**admin**</mark> \
Password <mark style="background-color:yellow;">\[device password found on the label]</mark>

<figure><img src="/files/Tq3aVqW7QQ1VXTs4Ta1q" alt=""><figcaption></figcaption></figure>

{% hint style="info" %}
*<mark style="color:red;">Note: If you've forgotten the password, you can press the Reset button at the back of the router for 10 seconds to restore the router to its factory default settings, allowing you to reset the password.</mark>*
{% endhint %}
{% endstep %}

{% step %}
Once logged in, navigate to the Basic tab, and click on WLAN Settings. Choose which network's name and password you want to change.&#x20;

{% endstep %}

{% step %}
Choose 2.4G SSID or 5G SSID (if needed). Replace the "SSID name" with your new WiFi name&#x20;

{% endstep %}

{% step %}
Go to the WPA Pre-Shared key field. First, remove the current password (you can reveal it by checking the Display Key box). Then, enter the new password you want to use.&#x20;

{% endstep %}

{% step %}
Hit Save/Apply to confirm the settings.

<figure><img src="/files/FfR2IkctbBn58YFmAOm9" alt=""><figcaption></figcaption></figure>
{% endstep %}

{% step %}
Reconnect your devices to Wi-Fi with the new name and password.

{% endstep %}
{% endstepper %}


# How to Manually Upgrade Firmware to Version 2.06 (from 1.14, 1.15, 2.04 & 2.05)

{% stepper %}
{% step %}
Obtain the latest software image version 2.06 (um\_DPN-BE7212GR\_2.06.bin format) from D-Link web site.

{% hint style="info" %}
*<mark style="color:red;">Note:</mark>* [*<mark style="color:red;">https://support.dlink.com.sg/consumer/wi-fi-7-multi-gigabit-router/dpn-be7212gr/downloads</mark>*](https://support.dlink.com.sg/consumer/wi-fi-7-multi-gigabit-router/dpn-be7212gr/downloads)
{% endhint %}

{% endstep %}

{% step %}
Connect your computer to the router either via Wi-Fi or by using an Ethernet cable..&#x20;

{% hint style="info" %}
*<mark style="color:$danger;">**⚠ Important:**</mark> <mark style="color:$danger;"></mark><mark style="color:$danger;">A wired connection is advised to prevent interruptions during the update process</mark>*
{% endhint %}

{% endstep %}

{% step %}
Once connected, open a web browser and type in the URL bar <https://192.168.0.1> and hit enter.&#x20;

{% hint style="info" %}
*<mark style="color:$danger;">Note: You might see a "Privacy Error" or similar security warning. This happens because the router uses a self-signed SSL certificate, which browsers may not recognize as secure.</mark>*
{% endhint %}

Here's how to proceed:

\
•Click on Advanced at the bottom of the warning page.\
•Then, select Continue to 192.168.0.1 (unsafe) to access the router's login page.

If you’re hesitant to proceed due to security concerns, you can review the certificate details to verify its issuer and confirm that it is associated with D-Link. To do this:

\
•Click the "Not Secure" icon or the padlock symbol (depending on your browser).\
•View the certificate details to confirm it was issued by the D-Link manufacturer<br>

<figure><img src="/files/h5EbxoNJPCzyEIojQUHN" alt=""><figcaption></figcaption></figure>

<figure><img src="/files/uZiYt1bppbiRlzzxHe3U" alt=""><figcaption></figcaption></figure>
{% endstep %}

{% step %}
Enter your admin username & password in their corresponding fields and click Login. The default username and password are printed on the router’s label at the bottom of the router. If you've set your own password, use that. Once entered, click Login to proceed.

<figure><img src="/files/9Fn7ZJ5PkUFwwxkIblo3" alt=""><figcaption></figcaption></figure>

{% hint style="info" %}
*<mark style="color:$danger;">Note:</mark>* <mark style="color:$danger;"></mark><mark style="color:$danger;">If you've forgotten the password, you can press the Reset button at the back of the router for 10 seconds to restore the router to its factory default settings, allowing you to reset the password.</mark>
{% endhint %}

{% endstep %}

{% step %}
Once logged in, go to the System tab, and click on Update Software. Select Choose File and locate firmware file you downloaded on Step 1

<figure><img src="/files/Ymt6j3M2jxv0QU9To3xH" alt=""><figcaption></figcaption></figure>
{% endstep %}

{% step %}
Click the **Update Software** button once to upload the new image file.\
Note: The update process takes about 2 minutes to complete, and your DSL Router will reboot.

{% endstep %}
{% endstepper %}


# How to install the DPN-BE7212GR Wi-Fi 7 Router via web GUI

{% stepper %}
{% step %}
If your internet connection is through an Ethernet cable from the wall instead of through an XDSL / Cable / PON modem, connect the Ethernet cable directly to the router's WAN port.

{% endstep %}

{% step %}
Connect your computer, smartphone, or tablet to the router either via Wi-Fi or using an Ethernet cable.

{% hint style="info" %}
*<mark style="color:red;">The default Wi-Fi password is printed on the label at the bottom of the router.</mark>*
{% endhint %}
{% endstep %}

{% step %}
Once connected, open a web browser and type in the URL bar <https://192.168.0.1> and hit enter.

{% hint style="info" %}
*<mark style="color:red;">You might see a "Privacy Error" or similar security warning. This happens because the router uses a self-signed SSL certificate, which browsers may not recognize as secure.</mark>*
{% endhint %}

<mark style="background-color:orange;">**Here's how to proceed:**</mark>

1. Click on Advanced at the bottom of the warning page.&#x20;
2. Then, select Continue to 192.168.0.1 (unsafe) to access the router's login page.

<mark style="background-color:orange;">**If you’re hesitant to proceed due to security concerns, you can review the certificate details to verify its issuer and confirm that it is associated with D-Link.**</mark>&#x20;

<mark style="background-color:$warning;">**To do this:**</mark>

1. Click the "Not Secure" icon or the padlock symbol (depending on your browser).
2. View the certificate details to confirm it was issued by the D-Link manufacturer

   <figure><img src="/files/DJtPfmPtJvqmc8aJ06tM" alt=""><figcaption></figcaption></figure>

   <figure><img src="/files/Jss8EBAehykv147jDdSG" alt=""><figcaption></figcaption></figure>

{% endstep %}

{% step %}
Enter your admin username & password in their corresponding fields and click Login. The default username and password are printed on the router’s label at the bottom of the router. If you've set your own password, use that. Once entered, click Login to proceed.

<figure><img src="/files/04i7mGgN93CW0PzIE6F7" alt=""><figcaption></figcaption></figure>

{% hint style="info" %}
*<mark style="color:red;">Note: If you've forgotten the password, you can press the Reset button at the back of the router for 10 seconds to restore the router to its factory default settings, allowing you to reset the password.</mark>*
{% endhint %}
{% endstep %}

{% step %}
Once you login to the router, you will see your current status of the router.

<figure><img src="/files/wGUquJ4EGFP5kU9vvG24" alt=""><figcaption></figcaption></figure>

{% endstep %}

{% step %}
To start configuring the internet of the router, please select "Basic" then select “WAN” on the left-hand side.

**For PPPoE:**&#x20;

* Connection Mode: IPv4 / PPPoE&#x20;
* MTU: 1492&#x20;
* MVLAN: -1 (typically left as -1 unless specified by your ISP)&#x20;
* VLAN ID: Enter the VLAN ID provided by your ISP. If no VLAN is required, enter -1 (VLAN is disabled).&#x20;

{% hint style="info" %}
*<mark style="color:red;">Note: Range: 1-4095, -1 (indicates VLAN is disabled)</mark>*
{% endhint %}

* PPPoE Account: Enter the PPPoE Account provided by your ISP.
* PPPoE Password: Enter the PPPoE Password provided by your ISP.
*

```
<figure><img src="/files/ocSM6YhF9JHCOufbEp3D" alt=""><figcaption></figcaption></figure>
```

* Click Save/Apply at the bottom of the page.

  <figure><img src="/files/tyqd7kQFyOY0s2a2g88N" alt=""><figcaption></figcaption></figure>

**For Dynamic IP** (most common for cable or fiber ISPs):

* Connection mode: IPv4 / IPoE&#x20;
* Select DHCP in the IPv4 address access mode&#x20;
* MTU: 1500&#x20;
* MVLAN: -1 (typically left as -1 unless specified by your ISP)&#x20;
* Enable NAT&#x20;
* VLAN ID: Enter the VLAN ID provided by your ISP. If no VLAN is required, enter -1 (VLAN is disabled).&#x20;

{% hint style="info" %}
*<mark style="color:red;">Note: ▪ Range: 1-4095, -1 (indicates VLAN is disabled)</mark>*
{% endhint %}

* Click Save/Apply
*

```
<figure><img src="/files/3jo41PJ2mTGvHnDEgD2q" alt=""><figcaption></figcaption></figure>
```

\
\
\
\
\ <br>
{% endstep %}
{% endstepper %}


# How to reset DPN-BE7212GR to its factory default settings

**Hardware RESET**

{% stepper %}
{% step %}
Use a straightened paperclip or a SIM ejector tool to press the RESET hole at the back of the DPN-7212GR device while it is powered on.

<figure><img src="/files/CzSkAih2xBpkCH5xKwrC" alt="" width="313"><figcaption></figcaption></figure>

{% endstep %}

{% step %}
Press and hold for 10 seconds, then release.

{% endstep %}

{% step %}
All LED’s will briefly turn off. When it is back on, the power LED will first come up on solid green. Then, all other LED’s will follow. This indicates that the device has been restored to its factory default settings.

{% endstep %}
{% endstepper %}

**Software RESET**

{% stepper %}
{% step %}
Open a web browser on your computer and type in the address bar: <https://192.168.0.1>

{% endstep %}

{% step %}
After accessing the router management page, enter the device username & password in their corresponding fields and click Login. Note: (The default username & password are printed on the label on the bottom of the device. If you have forgotten your password, please refer to the hardware RESET steps).

{% endstep %}

{% step %}
After logging in, click on System tab, then select Restore Default, and click Reset

<figure><img src="/files/NgzYgQCofJ8W5Lny69KU" alt=""><figcaption></figcaption></figure>
{% endstep %}

{% step %}
Click OK. Wait for the countdown timer to complete.

<figure><img src="/files/V8utdLuqksxqP77wQ6gD" alt=""><figcaption></figcaption></figure>

{% endstep %}
{% endstepper %}


# DPN-BE9600

## Datasheet

{% file src="/files/1sZ9ulKgCWU8dXpXgJ3P" %}

## Downloads/FAQ

{% columns %}
{% column width="50%" %}

{% endcolumn %}

{% column %}

{% endcolumn %}
{% endcolumns %}

***


# Downloads

<table><thead><tr><th width="128.75">Date</th><th width="442.9609375">Version / Changes</th><th data-type="files">Files</th></tr></thead><tbody><tr><td>N.A.</td><td>N.A.</td><td></td></tr><tr><td></td><td></td><td></td></tr><tr><td></td><td></td><td></td></tr></tbody></table>


# FAQs


# DPN-BE19000GR

## Datasheet

{% file src="/files/xdxgdKQW3Z3PYfAtcq9B" %}

## Downloads/FAQ

{% columns %}
{% column width="50%" %}
{% content-ref url="/spaces/AsNvP4j1V0u2MDOjtqo2/pages/MhpXza5SHrU5kEfuJ1w8" %}
[Downloads](/consumer/wi-fi-7-multi-gigabit-router/dpn-be19000gr/downloads)
{% endcontent-ref %}
{% endcolumn %}

{% column %}
{% content-ref url="/spaces/AsNvP4j1V0u2MDOjtqo2/pages/hAnz84qyWbuUkfyfQYvb" %}
[FAQs](/consumer/wi-fi-7-multi-gigabit-router/dpn-be19000gr/faqs)
{% endcontent-ref %}

{% endcolumn %}
{% endcolumns %}

***


# Downloads

<table><thead><tr><th width="128.75">Date</th><th width="442.9609375">Version / Changes</th><th data-type="files">Files</th></tr></thead><tbody><tr><td>N.A.</td><td>N.A.</td><td></td></tr><tr><td></td><td></td><td></td></tr><tr><td></td><td></td><td></td></tr></tbody></table>


# FAQs


# DWR-900V

## Datasheet

{% file src="/files/iYApa0t3dJMiC4uOBsKl" %}

## Downloads/FAQ

{% columns %}
{% column width="50%" %}
{% content-ref url="/spaces/AsNvP4j1V0u2MDOjtqo2/pages/3BpvVfFCUaoy8OnU1g2l" %}
[Downloads](/consumer/5g-4g-mobile-hotspot-mifi/dwr-900v/downloads)
{% endcontent-ref %}
{% endcolumn %}

{% column %}
{% content-ref url="/spaces/AsNvP4j1V0u2MDOjtqo2/pages/Vv4zpS1QEm1JEkxzri7q" %}
[FAQs](/consumer/5g-4g-mobile-hotspot-mifi/dwr-900v/faqs)
{% endcontent-ref %}
{% endcolumn %}
{% endcolumns %}


# Downloads

<table><thead><tr><th width="128.75">Date</th><th width="443.078125">Version / Changes</th><th data-type="files">Files</th></tr></thead><tbody><tr><td>N.A.</td><td>N.A.</td><td></td></tr><tr><td></td><td></td><td></td></tr><tr><td></td><td></td><td></td></tr></tbody></table>


# FAQs

{% content-ref url="/spaces/AsNvP4j1V0u2MDOjtqo2/pages/7pxwjTBsXowA7cLbqXDj" %}
[Quick Charging Guide](/consumer/5g-4g-mobile-hotspot-mifi/dwr-900v/faqs/quick-charging-guide)
{% endcontent-ref %}


# Quick Charging Guide

For best performance, use only the included D-Link charging cables. Third-party cables may not support all charging functions.

Please follow the cable labels provided in the cable packaging :

{% stepper %}
{% step %}

### STEP 1 - USE THIS CABLE FIRST&#x20;

(USB-A to USB-C Cable)

<figure><img src="/files/EsjtsrteEcunHpiJIzlJ" alt="" width="375"><figcaption></figcaption></figure>

Use when:

* Battery is fully drained (0%)
* Hotspot cannot power on

{% hint style="danger" %}
Charge until approximately 20% battery before switching to STEP 2
{% endhint %}

{% hint style="info" %}
Recommended power sources:\
• USB wall charger (5V/1A or 5V/2A)

• Laptop USB port

• USB hub
{% endhint %}

{% endstep %}

{% step %}

### STEP 2 - FAST CHARGING&#x20;

(USB-C to USB-C Cable)

<figure><img src="/files/GDBgKtnSntcgtfV68Cms" alt="" width="375"><figcaption></figcaption></figure>

Use when:

* Hotspot can power on normally
* Battery still has remaining charge

{% hint style="warning" %} <mark style="color:$danger;">**DO NOT use for 0% battery recovery**</mark>
{% endhint %}
{% endstep %}
{% endstepper %}

<figure><img src="/files/ZallJR3lMCpV9plTFUB3" alt=""><figcaption></figcaption></figure>


# DWR-910M

## Datasheet

{% file src="/files/ECN3NCXmK7hKhy5SQM1E" %}

## Downloads/FAQ

{% columns %}
{% column width="50%" %}
{% content-ref url="/spaces/AsNvP4j1V0u2MDOjtqo2/pages/acNyj80BRsDQbF9sZr6M" %}
[Downloads](/consumer/5g-4g-mobile-hotspot-mifi/dwr-910m/downloads)
{% endcontent-ref %}
{% endcolumn %}

{% column %}
{% content-ref url="/spaces/AsNvP4j1V0u2MDOjtqo2/pages/2axPO2r6pKfW6DTZH1cJ" %}
[FAQs](/consumer/5g-4g-mobile-hotspot-mifi/dwr-910m/faqs)
{% endcontent-ref %}
{% endcolumn %}
{% endcolumns %}


# Downloads

<table><thead><tr><th width="128.75">Date</th><th width="442.9609375">Version / Changes</th><th data-type="files">Files</th></tr></thead><tbody><tr><td>N.A.</td><td>N.A.</td><td></td></tr><tr><td></td><td></td><td></td></tr><tr><td></td><td></td><td></td></tr></tbody></table>


# FAQs


# DWR-930M

## Datasheet

{% file src="/files/2ygg60KpMPwesnY1KiJL" %}

## Datasheet B1

{% file src="/files/gYGCpVDq0AGX6z9xFnUX" %}

## Downloads/FAQ

{% columns %}
{% column %}
{% content-ref url="/spaces/AsNvP4j1V0u2MDOjtqo2/pages/96Yg1GWC3Qr8i4b8FGiZ" %}
[Downloads](/consumer/5g-4g-mobile-hotspot-mifi/dwr-930m/downloads)
{% endcontent-ref %}
{% endcolumn %}

{% column %}
{% content-ref url="/spaces/AsNvP4j1V0u2MDOjtqo2/pages/VVfM1RHQI9d0CcltfCod" %}
[FAQs](/consumer/5g-4g-mobile-hotspot-mifi/dwr-930m/faqs)
{% endcontent-ref %}

{% endcolumn %}
{% endcolumns %}

{% embed url="<https://youtu.be/b_Dc5q4_U6c?feature=shared>" %}

***


# Downloads

<table><thead><tr><th width="128.75">Date</th><th width="442.9609375">Version / Changes</th><th data-type="files">Files</th></tr></thead><tbody><tr><td>18/12/2024</td><td>1.03SEA (Roaming features added)</td><td><a href="/files/AcGt3FbdD5pJjHR2WGDB">/files/AcGt3FbdD5pJjHR2WGDB</a></td></tr><tr><td></td><td></td><td></td></tr><tr><td></td><td></td><td></td></tr></tbody></table>


# FAQs

{% content-ref url="/spaces/AsNvP4j1V0u2MDOjtqo2/pages/0wAndh3PZThmcHpnrrXm" %}
[How to update firmware manually on DWR-930M - 4G LTE Mobile Wi-Fi Hotspot](/consumer/5g-4g-mobile-hotspot-mifi/dwr-930m/faqs/how-to-update-firmware-manually-on-dwr-930m-4g-lte-mobile-wi-fi-hotspot)
{% endcontent-ref %}

{% file src="/files/KEz5chLZAi780cbpN4Vo" %}

{% file src="/files/Czz3qqWdlTgV0M8sT0Vm" %}

{% file src="/files/VLRnUtrLIS6B1R1dpJ0h" %}

{% file src="/files/0u8f2Dk25XNXxZEBHgKj" %}

{% file src="/files/NpDDk8vNgm90LNAh3oQi" %}


# How to update firmware manually on DWR-930M - 4G LTE Mobile Wi-Fi Hotspot

{% stepper %}
{% step %}
At the support Downloads of DWR-930M, look for the latest firmware version download the file on your computer.

<figure><img src="/files/7Ji4VUF9qV76lVCC4zND" alt=""><figcaption></figcaption></figure>
{% endstep %}

{% step %}
Connect your PC to the DWR-930M either via Wi-Fi or a USB cable

*<mark style="color:red;">Note: To avoid disruption during the firmware upgrade, it is advisable that you go for a USB cable connection</mark>*
{% endstep %}

{% step %}
Once connected, open a web browser and type in the address bar ***<http://192.168.0.1>***
{% endstep %}

{% step %}
You will be prompted to enter the username and password to access the router’s settings. \
The default username is <mark style="background-color:yellow;">admin</mark> and the password is <mark style="background-color:yellow;">admin</mark>

*<mark style="color:red;">Note: If you have changed the password and cannot remember it, you will need to reset the router to factory defaults.</mark>*

<figure><img src="/files/ZMwW31F2a5k8aNR6bK0s" alt=""><figcaption></figcaption></figure>
{% endstep %}

{% step %}
Once logged in, you should see the DWR-930M’s web-based management interface.
{% endstep %}

{% step %}
Navigate through the Router tab and then select Software Upgrade from the menu located on the left-hand side.
{% endstep %}

{% step %}
Choose Browse and locate the .bin or the zip file downloaded in <mark style="background-color:yellow;">**step 1.**</mark> Highlight the file by clicking it once then click Open. \
\
![](/files/oPMyAw8IYg2qXh1DGco9)Then, proceed by clicking on "Update" to initiate the firmware update process.

{% endstep %}
{% endstepper %}


# DWR-932M

## Datasheet

{% file src="/files/5WfQ7AdbH5VZmWHeORXq" %}

## Downloads/FAQ

{% columns %}
{% column %}
{% content-ref url="/spaces/AsNvP4j1V0u2MDOjtqo2/pages/YJhCm9IVcmPMaGVG6Lk8" %}
[Downloads](/consumer/5g-4g-mobile-hotspot-mifi/dwr-932m/downloads)
{% endcontent-ref %}

{% endcolumn %}

{% column %}
{% content-ref url="/spaces/AsNvP4j1V0u2MDOjtqo2/pages/gMnmRHOj0sRKG5u6JcoT" %}
[FAQs](/consumer/5g-4g-mobile-hotspot-mifi/dwr-932m/faqs)
{% endcontent-ref %}

{% endcolumn %}
{% endcolumns %}

***


# Downloads

<table><thead><tr><th width="128.75">Date</th><th width="442.9609375">Version / Changes</th><th data-type="files">Files</th></tr></thead><tbody><tr><td>N.A.</td><td>N.A.</td><td></td></tr><tr><td></td><td></td><td></td></tr><tr><td></td><td></td><td></td></tr></tbody></table>


# FAQs


# DWR-932W

## Datasheet

{% file src="/files/JSzKMNIE2O1WmKxRHbWZ" %}

## Downloads/FAQ

{% columns %}
{% column width="50%" %}
{% content-ref url="/spaces/AsNvP4j1V0u2MDOjtqo2/pages/xxix6GmZPh85DyKuq7xj" %}
[Downloads](/consumer/5g-4g-mobile-hotspot-mifi/dwr-932w/downloads)
{% endcontent-ref %}
{% endcolumn %}

{% column %}
{% content-ref url="/spaces/AsNvP4j1V0u2MDOjtqo2/pages/u05kBSTYXlFhjTNdVV3z" %}
[FAQs](/consumer/5g-4g-mobile-hotspot-mifi/dwr-932w/faqs)
{% endcontent-ref %}
{% endcolumn %}
{% endcolumns %}

***


# Downloads

<table><thead><tr><th width="128.75">Date</th><th width="442.9609375">Version / Changes</th><th data-type="files">Files</th></tr></thead><tbody><tr><td>N.A.</td><td>N.A.</td><td></td></tr><tr><td></td><td></td><td></td></tr><tr><td></td><td></td><td></td></tr></tbody></table>


# FAQs


# DWR-933M

## Datasheet

{% file src="/files/tXBWpmYlYdMgzBcDfSoE" %}

## Downloads/FAQ

{% columns %}
{% column width="50%" %}
{% content-ref url="/spaces/AsNvP4j1V0u2MDOjtqo2/pages/Faf5k8kRBfWcLu9CCsFx" %}
[Downloads](/consumer/5g-4g-mobile-hotspot-mifi/dwr-933m/downloads)
{% endcontent-ref %}
{% endcolumn %}

{% column %}
{% content-ref url="/spaces/AsNvP4j1V0u2MDOjtqo2/pages/oEx1YhWtp6NsmZSTBS53" %}
[FAQs](/consumer/5g-4g-mobile-hotspot-mifi/dwr-933m/faqs)
{% endcontent-ref %}
{% endcolumn %}
{% endcolumns %}


# Downloads

<table><thead><tr><th width="128.75">Date</th><th width="442.9609375">Version / Changes</th><th data-type="files">Files</th></tr></thead><tbody><tr><td>23/5/2025</td><td>V1.03SEA<br>Modifications and Bug Fixes:<br>-Roaming features added</td><td><a href="/files/Jlx0Ma4KZoneQ6zZkKuc">/files/Jlx0Ma4KZoneQ6zZkKuc</a></td></tr><tr><td></td><td></td><td></td></tr><tr><td></td><td></td><td></td></tr></tbody></table>


# FAQs


# How to setup D-Link DWR-933M 4G+ LTE Cat6 Wi-Fi 6 Mobile Hotspot with Nano SIM Card ?

{% embed url="<https://youtu.be/DcpcP5Rr49I>" %}


# How to configure the (SSID) wireless name and password of my DWR-933M Router via GUI and D-Link Mobi

{% stepper %}
{% step %}
From the device you want to connect to (smartphones, laptops, or computers). Connect\
your DWR-933M to the Wi-Fi or USB type C cable. The default Wi-Fi network name (SSID)\
is D-LINK2G-XXXX, with the password printed on the back of your router.

{% endstep %}

{% step %}
Once connected, open a web browser and type in the URL bar <https://192.168.1.1> and hit\
enter.

<mark style="color:$primary;">Note: You might see a "Privacy Error" or similar security warning for the first time. This</mark>\ <mark style="color:$primary;">happens because the router uses a self-signed SSL certificate, which browsers may not</mark>\ <mark style="color:$primary;">recognize as secure.</mark>

Here's how to proceed:

-Click on **Advanced** at the bottom of the warning page

-Then, **select Continue to 192.168.1.1 (unsafe)** to access the router's login page.

-If you’re hesitant to proceed due to security concerns, you can review the certificate\
details to verify its issuer and confirm that it is associated with D-Link by doing the\
procedure below:

* Click the "Not Secure" icon or the padlock symbol (depending on your\
  browser).
* View the certificate details to confirm it was issued by the D-Link\
  manufacturer

<figure><img src="/files/kKC17ADpiKSUnajcC263" alt=""><figcaption></figcaption></figure>

{% endstep %}

{% step %}
You will be prompted to enter the username and password to access the router’s\
settings.

Username: admin\
Password: \[device password found on the label]

<figure><img src="/files/MqBNDpfV8FiCAJCuxGy3" alt=""><figcaption></figcaption></figure>

{% endstep %}

{% step %}
Once logged in, navigate to the **My Wi-Fi** tab, and then **Basic.** Under the 2.4G and 5G\
wireless field. You can modify/create the **SSID (Wireless name)** and Password **(Wireless**\
**password)** and hit **Save** to confirm the settings.

<figure><img src="/files/27kgmlPSxhGxGYlSg9O1" alt=""><figcaption></figcaption></figure>

{% endstep %}
{% endstepper %}

**D-Link Mobile Connect App**

{% stepper %}
{% step %}
Download and install the “D-Link Mobile Connect app” from your mobile device’s Play\
Store / Apple store.

<figure><img src="/files/g4YYI8er5adWJmO8tFnX" alt=""><figcaption></figcaption></figure>

{% endstep %}

{% step %}
Ensure the DWR-933M is powered on. On your mobile device, go to Wi-Fi Settings and\
connect to the default Wi-Fi network name (SSID) D-LINK2G-XXXX, by default the\
password printed under the battery on the back of the device.

{% endstep %}

{% step %}

### Once connected to the DWR-933M wirelessly. Launch the     D-Link Mobile Connect App.

{% endstep %}

{% step %}
You will be prompted to enter the username and password to access the router’s settings.\
The default username is **admin** and the password (refer on the device label)

<mark style="color:$primary;">Note: Please check the box below indicating "I have read and agree to the User Agreement." And Press Login.</mark>

<figure><img src="/files/IZewuXkM4iB4zwgw6Z81" alt=""><figcaption></figcaption></figure>

{% endstep %}

{% step %}

### Tap the Wi-Fi Settings from the home screen

<figure><img src="/files/3l5Vbw6GMkeD9gS4RsYZ" alt=""><figcaption></figcaption></figure>

{% endstep %}

{% step %}
In the 2.4G and 5G Wi-Fi Settings, you have the option to change both the network name\
and password for your Wi-Fi.

{% endstep %}

{% step %}

### After making the changes, press “Confirm” to save and apply.

{% endstep %}

{% step %}
Once you've configured the Wi-Fi settings, wait for the changes to take effect. The router\
may need a moment to update its settings.

{% endstep %}

{% step %}

### After the settings are applied, you can connect your devices to the newly configured Wi-Fi networks using the updated SSID and password.

{% endstep %}
{% endstepper %}


# How to access the configuration page and change the device password of DWR-933M

{% stepper %}
{% step %}
From the device you want to connect to (smartphones, laptops, or computers). Connect\
your DWR-933M to the Wi-Fi or USB type C cable. The default Wi-Fi network name (SSID)\
is D-LINK2G-XXXX, with the password printed on the back of your router.

{% endstep %}

{% step %}
Once connected, open a web browser and type in the URL bar <https://192.168.1.1> and hit\
enter.

{% endstep %}

{% step %}
You will be prompted to enter the username and password to access the router’s\
settings.

Username: admin\
Password: \[device password on the label]

<figure><img src="/files/1L4yihDpRQzVZ2P9lIrd" alt=""><figcaption></figcaption></figure>

<mark style="color:$primary;">Note: If you have changed the password and cannot remember it, you will need to</mark>\ <mark style="color:$primary;">perform a hard reset on the router</mark>
{% endstep %}

{% step %}

### Navigate to the More tab, then click Login Settings on the left-hand menu.

{% endstep %}

{% step %}
Enter your **New Router User & Password** and **Confirm the Password**, then hit **“Save”**\
to confirm the settings.

<figure><img src="/files/Xe91NtPsRHGlFyhVWhgP" alt=""><figcaption></figcaption></figure>

{% endstep %}
{% endstepper %}


# How do I update firmware manually on DWR-933M Router

**FOTA (Firmware Over-The-Air) for DWR-933M** -- This router supports FOTA which means\
it automatically detect when new firmware versions are available from the D-Link servers. Once\
detected, the router downloads and installs the update in the background, ensuring the router is\
always running the latest software version. This eliminates the need for users to manually check\
for updates, improving the security, performance, and feature set of the device.

**Fallback Mechanism for Manual Updates** -- If the router fails to detect the update or there\
are issues with the automatic process, users have the option to manually upgrade their router’s\
firmware. To do so, you would need to visit the D-Link support website and choose his country at\
<https://www.dlink.com/en/change-region>, find the correct firmware for your router model, and\
download the appropriate firmware file. It’s important to ensure that the correct firmware file is\
selected, as installing incorrect firmware could cause malfunctions or even damage the device.

**Manual Firmware Update Process:**

{% stepper %}
{% step %}
Visit the D-Link support page and select your country at <https://www.dlink.com/en/change-region> and look for the latest firmware version of your specific device model and download\
the file on your computer.

{% endstep %}

{% step %}

### Connect your PC to the DWR-933M either via Wi-Fi or USB type C cable.

<mark style="color:$primary;">Note: To avoid disruption during the firmware upgrade, it is advised that you use a wired connection</mark>
{% endstep %}

{% step %}

### Once connected, open a web browser and type in the URL bar <https://192.168.1.1>

{% endstep %}

{% step %}
You will be prompted to enter the username and password to access the router’s\
settings.

Username: admin\
Password: \[device password on the label]

<figure><img src="/files/9e4GNFMNuUbYcnMBgFUW" alt=""><figcaption></figcaption></figure>

<mark style="color:$primary;">Note: If you have changed the password and cannot remember it, you will need to</mark>\ <mark style="color:$primary;">perform a hard reset on the router</mark>
{% endstep %}

{% step %}

### Once logged in, navigate to the More tab, then Click Upgrade from the left-hand menu

<figure><img src="/files/6WrRCRwvay4bzD8QplBn" alt=""><figcaption></figcaption></figure>

{% endstep %}

{% step %}
In the Local Upgrade Section, click "Local upgrade" and pick the firmware file and locate\
the .bin or the zip file downloaded in step 1.

{% endstep %}

{% step %}
Highlight the file by clicking it once then click Open. Then, click "Upload" to initiate the\
firmware update process.

{% endstep %}
{% endstepper %}


# How do I set up DWR-933M Router with Nano SIM card?

The DWR-933M is a simple portable mobile router that lets you connect to the internet using your\
SIM card. It's a plug-and-play device, which means you just insert your SIM card, and it should\
automatically connect to the network for internet access.

{% stepper %}
{% step %}
Ensure your SIM card has been registered and has active data plan. To insert your SIM\
card, follow these steps:

a. From the back of the device, and with the notch positioned at the bottom-left corner,\
lift the back plate upward to detach it from the device.

b. To insert your SIM card, follow the slot's diagram. Push the SIM card holder to\
unlock it, insert the nano SIM card carefully, ensure the gold contacts are facing down, and then pull it to lock it.
{% endstep %}

{% step %}
To put the battery, align the gold contacts at the top center of the battery with the gold\
contacts on the device. Then, carefully slide down the battery until it locks securely into\
place.

<mark style="color:$primary;">Note: The SSID (network name) and password are printed on the back of device (please take a photo for your reference incase you need to connect to the Wi-Fi)</mark>

<figure><img src="/files/clkj3tCaCFuYi7YR9jfB" alt=""><figcaption></figcaption></figure>

{% endstep %}

{% step %}
Power on the device, the home screen will appear. After a few seconds of inactivity, the\
screen will power off. To wake up the display, press the **Power Button** or **WPS Button.**<br>

<figure><img src="/files/MbKBHuzowiD43Fu6GtoY" alt=""><figcaption></figcaption></figure>

{% endstep %}

{% step %}
Connect your device (computer, smartphone, etc.) to the router's Wi-Fi by locating the\
default Network Name (SSID) printed on the router's label. Select this network from your\
device’s available Wi-Fi options and enter the default password, also found on the label.

The router should automatically connect to your mobile network. Once connected, you’ll have internet access.
{% endstep %}
{% endstepper %}

**Manual APN configuration (If auto-detection failed)**

When you insert the SIM card, the router typically detects the connection automatically. If it\
doesn't, you can manually set up the connection by entering the Access Point Name (APN)\
provided by your SIM card’s carrier or can be found on the carrier’s website or support page.

{% stepper %}
{% step %}
On a device connected to the router, open any browser (e.g., Chrome, Firefox). **Enter the**\
**router’s IP address:** Type **192.168.1.1** in the browser’s address bar and press **Enter**

<mark style="color:$primary;">Note: You might see a "Privacy Error" or similar security warning for the first time. This</mark>\ <mark style="color:$primary;">happens because the router uses a self-signed SSL certificate, which browsers may not</mark>\ <mark style="color:$primary;">recognize as secure.</mark>

Here's how to proceed:

-Click on **Advanced** at the bottom of the warning page

-Then, select **Continue to 192.168.1.1 (unsafe)** to access the router's login page.

If you’re hesitant to proceed due to security concerns, you can review the certificate\
details to verify its issuer and confirm that it is associated with D-Link by doing the\
procedure below:

* Click the "**Not Secure**" icon or the padlock symbol (depending on your\
  browser).
* View the certificate details to confirm it was issued by the D-Link\
  manufacturer

<figure><img src="/files/nVlD22snm0RAk1VyXI3z" alt=""><figcaption></figcaption></figure>

<figure><img src="/files/wtkJdwY4bjAHJYnZGfRH" alt=""><figcaption></figcaption></figure>

{% endstep %}

{% step %}
You will be prompted to enter the username and password to access the router’s\
settings.\
Username: admin\
Password: \[device password found on the label]

<figure><img src="/files/od1ELdH8ziWKIBhs1Vli" alt=""><figcaption></figcaption></figure>

{% endstep %}

{% step %}
After logging in, you’ll be directed to the admin page where you can configure other\
settings like Wi-Fi and APN.
{% endstep %}

{% step %}

### Skip the set-up wizard and click on Mobile tab. Click APN on the left-hand side

<figure><img src="/files/S18Ivg4y597jsqViSjPZ" alt=""><figcaption></figcaption></figure>

{% endstep %}

{% step %}
To manually input the APN, type it into the APN field provided by your telco provider and\
click **Save & Apply.**
{% endstep %}
{% endstepper %}

**D-Link Mobile Connect App**

{% stepper %}
{% step %}
Download and install the “D-Link Mobile Connect app” from your mobile device’s Play\
Store / Apple store.

<figure><img src="/files/SfRWPLtQkS5WPbysVTGi" alt=""><figcaption></figcaption></figure>

{% endstep %}

{% step %}
Ensure the DWR-933M is powered on. On your mobile device, go to Wi-Fi Settings and\
connect to the default Wi-Fi network name (SSID) D-LINK2G-XXXX, by default the\
password printed under the battery on the back of the device.

{% endstep %}

{% step %}
Once connected to the DWR-933M wirelessly. Launch the **D-Link Mobile Connect App.**
{% endstep %}

{% step %}
You will be prompted to enter the username and password to access the router’s settings.\
The default username is **admin** and the password (refer on the device label)

<mark style="color:$primary;">Note: Please check the box below indicating "I have read and agree to the User Agreement." And Press Login.</mark>

<figure><img src="/files/nvdtWsolx8TxdkCLFT4Q" alt=""><figcaption></figcaption></figure>

{% endstep %}

{% step %}
You'll notice a blue signal bar displayed on the screen, indicating that the router has\
successfully connected to the internet.

<figure><img src="/files/0SCFuiIebTa6uZaHcUTQ" alt=""><figcaption></figcaption></figure>

<mark style="color:$primary;">Note: If the connection isn't detected, you can manually set up the connection by entering</mark>\ <mark style="color:$primary;">the Access Point Name (APN) specific to your SIM card's carrier.</mark>
{% endstep %}

{% step %}

### Navigate to Mobile and Look for APN.

{% endstep %}

{% step %}
Enter the APN details, then proceed to save the changes. Remember to have the correct\
APN information, usually provided by your SIM card provider.

<figure><img src="/files/vobc98GymrIopgt0Lvof" alt=""><figcaption></figcaption></figure>

{% endstep %}
{% endstepper %}


# How do I factory reset DWR-933M

**Soft Reset via web GUI**

{% stepper %}
{% step %}
From the device you want to connect to (smartphones, laptops, or computers). Connect\
your DWR-933M to the Wi-Fi or USB type C cable. The default Wi-Fi network name (SSID)\
is D-LINK2G-XXXX, with the password printed on the back of your router.

{% endstep %}

{% step %}
Once connected, open a web browser and type in the URL bar <https://192.168.1.1> and hit\
enter.

{% endstep %}

{% step %}
You will be prompted to enter the username and password to access the router’s\
settings.

Username: admin\
Password: \[device password found on the label]

<figure><img src="/files/J72LSmk1uYKpg50SI6Tz" alt=""><figcaption></figcaption></figure>

{% endstep %}

{% step %}

### Once logged in, navigate to the More tab, then click Factory reset on the left-hand menu.

{% endstep %}

{% step %}

### To initiate the factory reset, click “Confirm factory reset”

<figure><img src="/files/Trayqkf1gEyVTchDG0UY" alt=""><figcaption></figcaption></figure>
{% endstep %}
{% endstepper %}

**Hard Reset**

{% stepper %}
{% step %}

### The reset button is located next to the WPS button.

{% endstep %}

{% step %}
Make sure the DWR-933M Router is turned on. Using an implement such as a\
straightened paperclip to press and hold the reset button on the router for 5 seconds and\
release.

{% endstep %}

{% step %}
As the device resets, all LED indicators will briefly turn off for a few seconds and then turn\
back on. Please wait for up to a minute for the reset procedure to be fully completed.

<figure><img src="/files/L2tg7S89glIISFE1PKtW" alt=""><figcaption></figcaption></figure>
{% endstep %}
{% endstepper %}

**D-Link Mobile Connect App**

{% stepper %}
{% step %}
Download and install the “D-Link Mobile Connect app” from your mobile device’s Play\
Store / Apple store.

<figure><img src="/files/My2Pg4lf3gDZtn2DJ2ir" alt=""><figcaption></figcaption></figure>

{% endstep %}

{% step %}
Ensure the DWR-933M is powered on. On your mobile device, go to Wi-Fi Settings and\
connect to the default Wi-Fi network name (SSID) D-LINK2G-XXXX or DLINK5G-XXXX,\
by default the password printed under the battery on the back of the device.

{% endstep %}

{% step %}

### Once connected to the DWR-933M wirelessly. Launch the D-Link Mobile Connect App.

{% endstep %}

{% step %}
You will be prompted to enter the username and password to access the router’s settings.\
The default username is **admin** and the password (refer on the device label)

<mark style="color:$primary;">Note: Please check the box below indicating "I have read and agree to the User Agreement." And Press Login.</mark>

<figure><img src="/files/KdGzSxm9vbxsg8xuNttH" alt=""><figcaption></figcaption></figure>

{% endstep %}

{% step %}

### Navigate to "Settings", then click on “Reset” to initiate the factory reset process

<figure><img src="/files/nl2MoQjhmHd5GTM6XtKm" alt=""><figcaption></figcaption></figure>

{% endstep %}
{% endstepper %}


# DWR-940M

## Datasheet

{% file src="/files/e617n4P6EzXaaUtsbAQb" %}

## Downloads/FAQ

{% columns %}
{% column width="50%" %}
{% content-ref url="/spaces/AsNvP4j1V0u2MDOjtqo2/pages/ef3qJFIDJXf5R779XOvW" %}
[Downloads](/consumer/5g-4g-mobile-hotspot-mifi/dwr-940m/downloads)
{% endcontent-ref %}
{% endcolumn %}

{% column %}
{% content-ref url="/spaces/AsNvP4j1V0u2MDOjtqo2/pages/fV6IORbq9A3BwtyTTbk2" %}
[FAQs](/consumer/5g-4g-mobile-hotspot-mifi/dwr-940m/faqs)
{% endcontent-ref %}
{% endcolumn %}
{% endcolumns %}


# Downloads

<table><thead><tr><th width="128.75">Date</th><th width="442.9609375">Version / Changes</th><th data-type="files">Files</th></tr></thead><tbody><tr><td>N.A.</td><td>N.A.</td><td></td></tr><tr><td></td><td></td><td></td></tr><tr><td></td><td></td><td></td></tr></tbody></table>


# FAQs


# F518

## Datasheet

{% file src="/files/r7OWe31kFHlyUasNw4hq" %}

## Downloads/FAQ

{% columns %}
{% column width="50%" %}
{% content-ref url="/spaces/AsNvP4j1V0u2MDOjtqo2/pages/HbOkNAxiJOjJQHfZG5ka" %}
[Downloads](/consumer/5g-4g-mobile-hotspot-mifi/f518/downloads)
{% endcontent-ref %}
{% endcolumn %}

{% column %}
{% content-ref url="/spaces/AsNvP4j1V0u2MDOjtqo2/pages/2E5jVO8AVuj37CwNIF7F" %}
[FAQs](/consumer/5g-4g-mobile-hotspot-mifi/f518/faqs)
{% endcontent-ref %}
{% endcolumn %}
{% endcolumns %}


# Downloads

<table><thead><tr><th width="128.75">Date</th><th width="442.9609375">Version / Changes</th><th data-type="files">Files</th></tr></thead><tbody><tr><td>N.A.</td><td>N.A.</td><td></td></tr><tr><td></td><td></td><td></td></tr><tr><td></td><td></td><td></td></tr></tbody></table>


# FAQs


# DWR-932C

## Datasheet

{% file src="/files/U2wFoBBKBhqrh1wHYXYV" %}

## Manual

{% file src="/files/Ufk32w3vdQTYor7FKTun" %}

## Downloads/FAQ

{% columns %}
{% column width="50%" %}
{% content-ref url="/spaces/AsNvP4j1V0u2MDOjtqo2/pages/6QYEXJymFYetCUiCKEFi" %}
[Downloads](/consumer/5g-4g-mobile-hotspot-mifi/dwr-932c/downloads)
{% endcontent-ref %}
{% endcolumn %}

{% column %}
{% content-ref url="/spaces/AsNvP4j1V0u2MDOjtqo2/pages/ocqtLZu0hndTGYM3VinW" %}
[FAQs](/consumer/5g-4g-mobile-hotspot-mifi/dwr-932c/faqs)
{% endcontent-ref %}
{% endcolumn %}
{% endcolumns %}

***


# Downloads

<table><thead><tr><th width="128.75">Date</th><th width="442.9609375">Version / Changes</th><th data-type="files">Files</th></tr></thead><tbody><tr><td>8/01/2020</td><td>1.0.0.8<br>Notes:<br>Latest updates for H/W A1</td><td><a href="/files/FmrIfh4WGtSBzGcDgcPs">/files/FmrIfh4WGtSBzGcDgcPs</a></td></tr><tr><td></td><td></td><td></td></tr><tr><td></td><td></td><td></td></tr></tbody></table>


# FAQs

{% content-ref url="/spaces/AsNvP4j1V0u2MDOjtqo2/pages/IWiIp2a1H4Xy6T747jZw" %}
[How to setup DWR-932](/consumer/5g-4g-mobile-hotspot-mifi/dwr-932c/faqs/how-to-setup-dwr-932)
{% endcontent-ref %}


# How to setup DWR-932

{% embed url="<https://youtu.be/tTD_pJ-HKdY>" %}


# DWR-730

## Datasheet

### For DWR-730

{% file src="/files/mb0eZLgc6LnR8aUjNCzo" %}

### For DWR-730-B1

{% file src="/files/xvL3H5cD7FH9GFpKwPkH" %}

## Downloads/FAQ

{% columns %}
{% column width="50%" %}
{% content-ref url="/spaces/AsNvP4j1V0u2MDOjtqo2/pages/t7MwHj5HDl8qbwBrAO4u" %}
[Downloads](/consumer/5g-4g-mobile-hotspot-mifi/dwr-730/downloads)
{% endcontent-ref %}
{% endcolumn %}

{% column %}
{% content-ref url="/spaces/AsNvP4j1V0u2MDOjtqo2/pages/yCtZ9ThRyy8rtZtGVvFL" %}
[FAQs](/consumer/5g-4g-mobile-hotspot-mifi/dwr-730/faqs)
{% endcontent-ref %}
{% endcolumn %}
{% endcolumns %}

***


# Downloads

<table><thead><tr><th width="128.75">Date</th><th width="442.9609375">Version / Changes</th><th data-type="files">Files</th></tr></thead><tbody><tr><td>N.A.</td><td>N.A.</td><td></td></tr><tr><td></td><td></td><td></td></tr><tr><td></td><td></td><td></td></tr></tbody></table>


# FAQs


# DWR-530

## Datasheet

{% file src="/files/tz02kkCkuHYVHdAXCNwe" %}

## Manual

{% file src="/files/ZkL0JvXsRvHWWkX0A7U0" %}

{% file src="/files/p1vfYD4rgw296NQdVugp" %}

## Downloads/FAQ

{% columns %}
{% column width="50%" %}
{% content-ref url="/spaces/AsNvP4j1V0u2MDOjtqo2/pages/3rdVhouqkdggLYkDpSe3" %}
[Downloads](/consumer/5g-4g-mobile-hotspot-mifi/dwr-530/downloads)
{% endcontent-ref %}
{% endcolumn %}

{% column %}
{% content-ref url="/spaces/AsNvP4j1V0u2MDOjtqo2/pages/kTl8JG2thuir9WlvdX0b" %}
[FAQs](/consumer/5g-4g-mobile-hotspot-mifi/dwr-530/faqs)
{% endcontent-ref %}
{% endcolumn %}
{% endcolumns %}

***


# Downloads

<table><thead><tr><th width="128.75">Date</th><th width="442.9609375">Version / Changes</th><th data-type="files">Files</th></tr></thead><tbody><tr><td>N.A.</td><td>N.A.</td><td></td></tr><tr><td></td><td></td><td></td></tr><tr><td></td><td></td><td></td></tr></tbody></table>


# FAQs


# DWR-U2000

## Datasheet

{% file src="/files/dMxUZNFlBVlDeIDtt4mz" %}

## Downloads/FAQ

{% columns %}
{% column width="50%" %}
{% content-ref url="/spaces/AsNvP4j1V0u2MDOjtqo2/pages/r4dSsGJ9lmP73ySXIc5K" %}
[Downloads](/consumer/5g-4g-mobile-hotspot-mifi/dwr-u2000/downloads)
{% endcontent-ref %}

{% endcolumn %}

{% column %}
{% content-ref url="/spaces/AsNvP4j1V0u2MDOjtqo2/pages/Uo7SkiCzsBZGPoAucMDu" %}
[FAQs](/consumer/5g-4g-mobile-hotspot-mifi/dwr-u2000/faqs)
{% endcontent-ref %}
{% endcolumn %}
{% endcolumns %}

***


# Downloads

<table><thead><tr><th width="128.75">Date</th><th width="442.9609375">Version / Changes</th><th data-type="files">Files</th></tr></thead><tbody><tr><td>N.A.</td><td>N.A.</td><td></td></tr><tr><td></td><td></td><td></td></tr><tr><td></td><td></td><td></td></tr></tbody></table>


# FAQs

{% file src="/files/eITZvxipWVjk6EnecxuO" %}


# DWR-U2100

## Datasheet

{% file src="/files/ScKtCdkvV2IMjlWMec8A" %}

## Downloads/FAQ

{% columns %}
{% column width="50%" %}
{% content-ref url="/spaces/AsNvP4j1V0u2MDOjtqo2/pages/soA6ryumFwsoP5Q33GKH" %}
[Downloads](/consumer/5g-4g-mobile-hotspot-mifi/dwr-u2100/downloads)
{% endcontent-ref %}

{% endcolumn %}

{% column %}
{% content-ref url="/spaces/AsNvP4j1V0u2MDOjtqo2/pages/Zhhy4v89l6sjOPETMT0Y" %}
[FAQs](/consumer/5g-4g-mobile-hotspot-mifi/dwr-u2100/faqs)
{% endcontent-ref %}

{% endcolumn %}
{% endcolumns %}

***


# Downloads

<table><thead><tr><th width="128.75">Date</th><th width="442.9609375">Version / Changes</th><th data-type="files">Files</th></tr></thead><tbody><tr><td>24/06/2025</td><td>1.11SEA<br>Modifications and Bug Fixes;<br>*Strictly ONLY for DWR-U2100 devices with version 1.08 only</td><td><a href="/files/wn9fXZpKAvYbQecFYQMu">/files/wn9fXZpKAvYbQecFYQMu</a></td></tr><tr><td></td><td></td><td></td></tr><tr><td></td><td></td><td></td></tr></tbody></table>


# FAQs

{% content-ref url="/spaces/AsNvP4j1V0u2MDOjtqo2/pages/TNx9GKyBwWHrxA7iUq18" %}
[How to update firmware on DWR-U2100 5G Mobile Hotspot](/consumer/5g-4g-mobile-hotspot-mifi/dwr-u2100/faqs/how-to-update-firmware-on-dwr-u2100-5g-mobile-hotspot)
{% endcontent-ref %}

{% content-ref url="/spaces/AsNvP4j1V0u2MDOjtqo2/pages/8QNOL8lMqmFcjnS3nO64" %}
[How to setup DWR-U2100 5G Wi-Fi Mobile Hotspot with Nano SIM card](/consumer/5g-4g-mobile-hotspot-mifi/dwr-u2100/faqs/how-to-setup-dwr-u2100-5g-wi-fi-mobile-hotspot-with-nano-sim-card)
{% endcontent-ref %}

{% content-ref url="/spaces/AsNvP4j1V0u2MDOjtqo2/pages/VlytAGUxtnWLyrNvFdQ0" %}
[How to reset DWR-U2100 5G Mobile Hotspot](/consumer/5g-4g-mobile-hotspot-mifi/dwr-u2100/faqs/how-to-reset-dwr-u2100-5g-mobile-hotspot)
{% endcontent-ref %}

{% content-ref url="/spaces/AsNvP4j1V0u2MDOjtqo2/pages/susMoeJmseStrbNmLRwM" %}
[How to access the configuration page and change the device password on DWR-U2100](/consumer/5g-4g-mobile-hotspot-mifi/dwr-u2100/faqs/how-to-access-the-configuration-page-and-change-the-device-password-on-dwr-u2100)
{% endcontent-ref %}

{% content-ref url="/spaces/AsNvP4j1V0u2MDOjtqo2/pages/9cCLsu3l4nMJJDYfVkEf" %}
[How to configure the wireless network name and wireless password on DWR-U2100 via GUI and D-Link Mob](/consumer/5g-4g-mobile-hotspot-mifi/dwr-u2100/faqs/how-to-configure-the-wireless-network-name-and-wireless-password-on-dwr-u2100-via-gui-and-d-link-mob)
{% endcontent-ref %}

{% content-ref url="/spaces/AsNvP4j1V0u2MDOjtqo2/pages/l9Mo7pCQaxQDsucJvJYZ" %}
[How to setup D-Link DWR-U2100 5G Wi-Fi 6 Mobile Hotspot Malaysia with nano-SIM Card?](/consumer/5g-4g-mobile-hotspot-mifi/dwr-u2100/faqs/how-to-setup-d-link-dwr-u2100-5g-wi-fi-6-mobile-hotspot-malaysia-with-nano-sim-card)
{% endcontent-ref %}


# How to configure the wireless network name and wireless password on DWR-U2100 via GUI and D-Link Mob

**WebGUI**

{% stepper %}
{% step %}
From the device you want to connect to (smartphones, laptops, or computers). Connect\
your DWR-U2100 to the Wi-Fi or USB type C cable

-The SSID will appear as D-Link2G-XXXX or D-Link5G-XXXX

-The default Wi-Fi password is printed on the label at the back of the device
{% endstep %}

{% step %}
Once connected, open a web browser and type in the URL bar <https://192.168.0.1> and hit\
enter.

{% endstep %}

{% step %}

### You will be prompted to enter the username and password to access the router’s settings

**Username**: admin

**Password**: (printed on the device label)

<figure><img src="/files/NilZYIC0y3vczFzeYLRT" alt=""><figcaption></figcaption></figure>

<mark style="color:$primary;">Note: If you have changed the password and cannot remember it, you will need to perform a hard reset on the router</mark>
{% endstep %}

{% step %}
Once logged in, navigate to the **My Wi-Fi** tab, and then **Basic**. Under the 2.4G and 5G\
wireless fields, you can modify/create a new **SSID (Wireless name)** and **Password**\
**(Wireless password)** then hit **Save** to confirm the settings.

<figure><img src="/files/t4rvGUSj131JoIMpzd1J" alt=""><figcaption></figcaption></figure>
{% endstep %}
{% endstepper %}

**D-Link Mobile Connect App**

{% stepper %}
{% step %}
Download and install the D-Link Mobile Connect app from your mobile device (App Store\
for iOS or Google Play Store for Android)

<figure><img src="/files/VvUj2XrRSGI5vHAsU9Za" alt=""><figcaption></figcaption></figure>

{% endstep %}

{% step %}
Ensure the DWR-U2100 is powered on. On your mobile device, go to **Wi-Fi Settings** and\
connect to its default Wi-Fi network

-The default SSID will appear as **D-Link2G-XXXX** or **D-Link5G-XXXX**

-Wi-Fi password is printed on the label at the back of the device.
{% endstep %}

{% step %}

### Once connected, launch the D-Link Mobile Connect App.

{% endstep %}

{% step %}

### You will be prompted to enter the username and password to access the router’s settings.

**Username**: admin

**Password**: (printed on the device label)

<figure><img src="/files/ph9Ae018SSuLA1Yd6A9l" alt=""><figcaption></figcaption></figure>

<mark style="color:$primary;">Note: Please check the box below indicating "I have read and agreed to the User</mark>\ <mark style="color:$primary;">Agreement" then tap Login.</mark>
{% endstep %}

{% step %}

### Tap Wi-Fi Settings from the home screen

<figure><img src="/files/tIZ8Muwtvdxc1Bh6G2m9" alt=""><figcaption></figcaption></figure>

{% endstep %}

{% step %}
In the 2.4G and 5G Wi-Fi Settings, you have the option to change both the network\
name and password for your Wi-Fi.

{% endstep %}

{% step %}

### After making the changes, press Confirm to save and apply.

{% endstep %}

{% step %}
Once you've configured the Wi-Fi settings, wait for the changes to take effect. The router\
may need a moment to update its settings.

{% endstep %}

{% step %}

### After the settings are applied, you can connect your devices to the newly configured Wi-Fi networks using the updated SSID and password.

{% endstep %}
{% endstepper %}


# How to update firmware on DWR-U2100 5G Mobile Hotspot

### FOTA (Firmware Over-The-Air) - Automatic Update

The DWR-U2100 supports automatic firmware updates via FOTA. When a new firmware version\
becomes available on D-Link’s servers, the router detects it, downloads the update, and installs\
it automatically in the background. This ensures the device always runs the latest firmware with\
up-to-date security, performance optimizations, and feature enhancements, no manual update\
required.

**Firmware Update via D-Link Mobile Connect App**

{% stepper %}
{% step %}
Download and install the **D-Link Mobile Connect** app from your mobile device (App Store\
for iOS or Google Play Store for Android)

<figure><img src="/files/SQnpI83rThCOHvp4d2kf" alt=""><figcaption></figcaption></figure>

{% endstep %}

{% step %}

### Ensure the DWR-U2100 is powered on. On your mobile device, go to Wi-Fi Settings and connect to its default Wi-Fi network&#x20;

* The default SSID will appear as **D-Link2G-XXXX** or **D-Link5G-XXXX**
* Wi-Fi password is printed on the label at the back of the device.

{% endstep %}

{% step %}

### Once connected, launch the D-Link Mobile Connect App.

{% endstep %}

{% step %}

### You will be prompted to enter the username and password to access the router’s settings.

-Username: admin

-Password: (printed on the device label)
{% endstep %}

{% step %}

<figure><img src="/files/5dQWW1zi3xRrdkJWsH3J" alt=""><figcaption></figcaption></figure>

Note: Please check the box below indicating "I have read and agreed to the User Agreement"\
then tap Login.

{% endstep %}

{% step %}

### Tap the Settings icon located at the bottom-right corner, then select Update.

{% endstep %}

{% step %}

### Tap Check for New Version to scan for any available firmware updates.

Note: Ensure your DWR-U2100 is connected to the internet before starting the firmware update in the app, so it can check and download the latest version.
{% endstep %}
{% endstepper %}

**Manual Firmware Update Process**

**Fallback Mechanism for Manual Updates** -- If the router fails to detect the update or there are\
issues with the automatic process, users have the option to manually upgrade their router’s\
firmware.

**Important Firmware Update Notice:**\
Make sure to use the correct firmware file that matches your device's model and the country or\
region where it was purchased. Installing the wrong firmware version may cause the device to\
malfunction or void the warranty. Always double-check your device's hardware version and\
region-specific firmware before proceeding with any update.

{% stepper %}
{% step %}
Visit the D-Link support page and select your country at <https://www.dlink.com/en/changeregion> and look for the latest firmware version of your specific device model and download the file on your computer.

{% endstep %}

{% step %}

### Connect your PC to the DWR-U2100 either via Wi-Fi or USB type C cable.

-The SSID will appear as D-Link2G-XXXX or D-Link5G-XXXX

-The default Wi-Fi password is printed on the label at the back of the device

*Note: To avoid disruption during the firmware upgrade, it is advised that you use a wired connection*
{% endstep %}

{% step %}
Once connected, open a web browser and type in the URL bar <https://192.168.0.1> and hit\
enter.

{% endstep %}

{% step %}

### You will be prompted to enter the username and password to access the router’s settings.

-**Username**: admin

-**Password**: (printed on the device label

<figure><img src="/files/eyuGyVvMB45iVnoO3stK" alt=""><figcaption></figcaption></figure>

*Note: If you have changed the password and cannot remember it, you will need to perform a hard reset on the router*
{% endstep %}

{% step %}
Once logged in, navigate to the **More** tab, then Click **Upgrade** from the left-hand menu

<figure><img src="/files/F0udmYH5dJ75PkjWbuHL" alt=""><figcaption></figcaption></figure>
{% endstep %}

{% step %}
In the Local Upgrade Section, click **Local upgrade**. Select the firmware file and locate\
the .bin or the zip file downloaded in **step 1**

{% endstep %}

{% step %}
Highlight the file by clicking it once then click Open. Then, click **"Upload"** to initiate the\
firmware update

{% endstep %}
{% endstepper %}


# How to setup DWR-U2100 5G Wi-Fi Mobile Hotspot with Nano SIM card

*Simply insert your active 5G or 4G SIM card into the device. It should automatically detect the network and start broadcasting a Wi-Fi signal. You can then connect your devices using the default Wi-Fi name (SSID) and password printed on the device.*

You can set up the DWR-U2100 using either the Web GUI or the D-Link Mobile Connect App.\
Choose the method that’s most convenient for you:

**Method 1: Using the D-Link Mobile Connect App**

{% stepper %}
{% step %}
Download and install the D-Link Mobile Connect app from your mobile device (App Store\
for iOS or Google Play Store for Android)

<figure><img src="/files/nFnV26f7OtaqRByHtzVu" alt=""><figcaption></figcaption></figure>

{% endstep %}

{% step %}

### Power on your DWR-U2100 and insert your active SIM card

**Note**: Make sure your SIM card is registered with your mobile provider and has an active data plan
{% endstep %}

{% step %}

### On your phone, connect to the router’s default Wi-Fi network.

-The default SSID will appear as **D-Link2G-XXXX** or **D-Link5G-XXXX**

-Wi-Fi password is printed on the label at the back of the device.
{% endstep %}

{% step %}

### Once connected, launch the D-Link Mobile Connect App.

{% endstep %}

{% step %}

### You will be prompted to enter the username and password to access the router’s settings

**Username**: admin

**Password**: (found on the label at the back of the device)

<figure><img src="/files/DnjjrTisdjiqF2i04Mw5" alt=""><figcaption></figcaption></figure>

*<mark style="color:$primary;">Note: Please check the box below indicating "I have read and agreed to the</mark> <mark style="color:$primary;"></mark><mark style="color:$primary;">**User Agreement"**</mark> <mark style="color:$primary;"></mark><mark style="color:$primary;">then tap</mark> <mark style="color:$primary;"></mark><mark style="color:$primary;">**Login.**</mark>*
{% endstep %}

{% step %}
You'll see a blue signal bar displayed on the screen, indicating that the router has\
successfully connected to the internet.

<figure><img src="/files/bOa7TGt8eh1Ez3oOovEN" alt=""><figcaption></figcaption></figure>
{% endstep %}
{% endstepper %}

**What should I do if my router doesn’t automatically detect the SIM card connection?**

Ensure the SIM card is properly inserted into the router. If the connection isn't detected, you\
may need to set it up manually by entering the Access Point Name (APN) provided by your\
mobile carrier. You can find this information on your carrier’s website or support page.

{% stepper %}
{% step %}

### Navigate to Mobile and look for APN

{% endstep %}

{% step %}
Enter the APN details, then tap the Check Mark on the upper right corner to save the\
changes. Remember to have the correct APN information, usually provided by your SIM\
card provider

<figure><img src="/files/Kf2fOWymfLK4sbJuRNlU" alt=""><figcaption></figcaption></figure>
{% endstep %}
{% endstepper %}

**Method 2: Using the web interface (Web GUI)**

*<mark style="color:$primary;">You may access the router’s settings via a wired (Type-C) or wireless connection:</mark>*

**Option A: Wired Connection (Type-C to Laptop)**

{% stepper %}
{% step %}

### Connect the DWR-U2100 to your desktop or laptop computer using a USB Type-C cable.

{% endstep %}

{% step %}

### On your computer, open a web browser and go to <https://192.168.0.1>

{% endstep %}
{% endstepper %}

**Option B: Wireless Connection**

{% stepper %}
{% step %}

### On your device (computer, smartphone, tablet, etc.), go to    Wi-Fi settings

{% endstep %}

{% step %}

### Connect to the router’s default Wi-Fi network:

-The SSID will appear as D-Link2G-XXXX or D-Link5G-XXXX

-The default Wi-Fi password is printed on the label at the back of the device
{% endstep %}

{% step %}

### Open a web browser and go to <https://192.168.0.1>

{% endstep %}

{% step %}

### Log in with:

**Username**: admin

**Password**: (printed on the device label)

<figure><img src="/files/0ESD6hQBrz3CJY2iBr2X" alt=""><figcaption></figcaption></figure>

<mark style="color:$primary;">After logging in, you will ll be directed to the admin page where you can configure settings such as Wi-Fi and APN settings.</mark>
{% endstep %}
{% endstepper %}

**To manually configure APN settings**

{% stepper %}
{% step %}

### Click on Mobile tab then, click APN on the menu on the left pane.

{% endstep %}

{% step %}
To manually input the APN, type it into the APN field provided by your telco provider and\
click **Save & Apply**

<figure><img src="/files/yw4SfEOxQmmt19qvEXMK" alt=""><figcaption></figcaption></figure>

{% endstep %}
{% endstepper %}


# How to reset DWR-U2100 5G Mobile Hotspot

**Hard Reset Procedure**

The reset button is located next to the WPS button.

\
Make sure the DWR-U2100 Router is turned on. Using an implement such as an unfolded\
paperclip to press and hold the reset button on the router for 5 seconds and release.

\
As the device resets, the LCD screen will turn off and then turn back on. Please wait for up to a\
minute for the reset procedure to be fully completed.

<figure><img src="/files/lGl2lILiAvPNzhmrVOKc" alt=""><figcaption></figcaption></figure>

**Hard Reset via LCD Touchscreen Interface:**

{% stepper %}
{% step %}

### Tap System, then Factory Reset

<figure><img src="/files/Vbvx1qyrFk4xku7mSOuA" alt=""><figcaption></figcaption></figure>

{% endstep %}

{% step %}
Tap **Factory Reset** again on the next page then tap **OK** to initiate reset process and\
restore to default settings.

<figure><img src="/files/w37d8Vp7viEGm2yFBowi" alt=""><figcaption></figcaption></figure>

{% endstep %}
{% endstepper %}

**Hard Reset via WebGUI**

{% stepper %}
{% step %}
Connect your DWR-U2100 using a USB Type-C cable or Wi-Fi (from smartphones,\
laptops, or computers).

<mark style="color:$primary;">Note: The default Wi-Fi network name (SSID) is D-LINK2G-XXXX and D-Link5G-XXXX, by default the password printed under the battery on the back of device.</mark>
{% endstep %}

{% step %}
Once connected, open a web browser and type in the URL bar <https://192.168.0.1> and hit\
enter.

{% endstep %}

{% step %}

### You will be prompted to enter the username and password to access the router’s settings.

Username: admin

Password: (default password found on the router’s label)

<figure><img src="/files/yRtBG6LctI8VKWQ6ImVw" alt=""><figcaption></figcaption></figure>

{% endstep %}

{% step %}
Once logged in, navigate to the **More** tab, then click **Factory reset** on the left-hand\
menu.

{% endstep %}

{% step %}

### To initiate the factory reset, click Confirm factory reset

<figure><img src="/files/waSq1vSW4Ow3wMc08Bbj" alt=""><figcaption></figcaption></figure>

{% endstep %}
{% endstepper %}

**Hard Reset via D-Link Mobile Connect APP**

{% stepper %}
{% step %}
Download and install the “D-Link Mobile Connect app” from your mobile device’s Play\
Store / Apple store.

<figure><img src="/files/25QMdyA9AEJzHLY8ARES" alt=""><figcaption></figcaption></figure>

{% endstep %}

{% step %}
Ensure the DWR-U2100 is powered on. On your mobile device, go to Wi-Fi Settings and\
connect to the default Wi-Fi network name (SSID) D-LINK2G-XXXX or DLINK5G-XXXX,\
by default the Wi-Fi password printed under the battery on the back of the device.

{% endstep %}

{% step %}

### Once connected to the DWR-U2100 wirelessly. Launch the D-Link Mobile Connect App.

{% endstep %}

{% step %}
You will be prompted to enter the username and password to access the router’s settings.\
The default username is **admin** and the **password** (refer on the device label)

Note: Please check the box below indicating "I have read and agreed to the **User Agreement**." And Press Login.

<figure><img src="/files/Y52r0G0uwARLtBtybBqS" alt=""><figcaption></figcaption></figure>

{% endstep %}

{% step %}

### Navigate to Settings, then click on Reset to initiate the factory reset process

<figure><img src="/files/Zffbc1v0A5690RZu9uOV" alt=""><figcaption></figcaption></figure>

{% endstep %}
{% endstepper %}


---

[Next Page](/llms-full.txt/1)