> For the complete documentation index, see [llms.txt](https://support.dlink.com.sg/llms.txt). Markdown versions of documentation pages are available by appending `.md` to page URLs; this page is available as [Markdown](https://support.dlink.com.sg/consumer/aquila-pro-ai-wi-fi-6-router/m30/faqs/how-to-manually-configure-internet-settings-on-m30.md).
# How to manually configure internet settings on M30
Note: The specific instructions may vary depending on your Internet Service Provider (ISP).
**AQUILA PRO AI App**
{% stepper %}
{% step %}
### Hardware Connection:
* Connect the power adapter to the router and plug into a power outlet
* Connect your modem to the router’s WAN (Internet Port) using an Ethernet\
Cable
{% endstep %}
{% step %}
Open the AQUILA PRO AI app on your device. Then, **Sign in**. (Ensure you are\
connected to the D-Link router’s Wi-Fi)
{% endstep %}
{% step %}
### Tap your device (M30 – Home WiFi) then tap Home Wi-Fi
{% endstep %}
{% step %}
### Locate and tap Internet Settings. Choose the appropriate connection type:
* **Dynamic** (DHCP) for cable connections
* **PPPoE** (You’ll need to enter the username and password provided by your ISP.)
* **Static** (You’ll need the IP address, Subnet Mask, DG, and the DNS server\
provided by your ISP)
{% endstep %}
{% step %}
VLAN settings: Enable the VLAN state then Enter the VLAN ID’s (may vary depending\
on your Internet Service Provider) or leave it disabled if your ISP does not require it.
{% endstep %}
{% endstepper %}
#### WebGUI
{% stepper %}
{% step %}
Connect your computer or device to one of the router’s LAN ports using another ethernet\
cable or via Wi-Fi (By default, Password located on the label sticker at the back of the\
router)
{% endstep %}
{% step %}
If this is your first time installing the router, open your web browser and enter\
into the browser (xxxx represents the last 4 digits of the\
MAC address). Enter the Admin Password and click login to start the configuration\
process.
The web address and default admin password are printed on the device label\ at the bottom of the device.
NOTE: If you have changed the password and cannot remember it, you will need to reset the\ router to factory defaults.
{% endstep %}
{% step %}
### Go to Settings then Internet
* **IPv4 - Dynamic IP (DHCP)**
Select Dynamic IP (DHCP) to obtain IP address information automatically from\
your Internet Service Provider (ISP). Select this option if your ISP does not specify an IP address to use. Click Save at any time to save the changes you have made on this page.
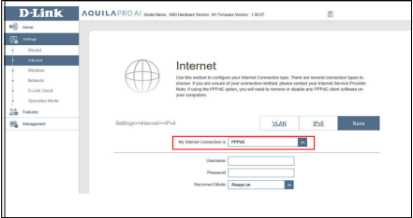
* **IPv4 – PPPoE**
Select PPPoE if your ISP provides and requires you to enter a PPPoE username\
and password in order to connect to the Internet. Click Save at any time to save\
the changes you have made on this page.
**Username**: Enter the username provided by your ISP.\
**Password**: Enter the password provided by your ISP.\
**Reconnect Mode**: Select either Always on, On Demand, or Manual.
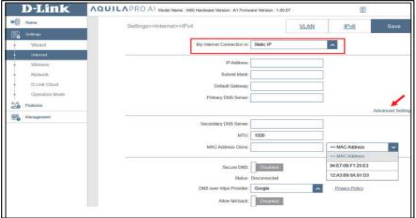
* **IPv4 - Static IP**
Select Static IP if your IP information is provided by your Internet Service\
Provider (ISP). Click Save at any time to save the changes you have made on\
this page.\
**IP Address**: Enter the IP address provided by your ISP.\
**Subnet Mask**: Enter the subnet mask provided by your ISP.\
**Default Gateway**: Enter the default gateway address provided by your ISP.\
**Primary DNS Server**: Enter the primary DNS server IP address assigned by\
your ISP.
{% endstep %}
{% step %}
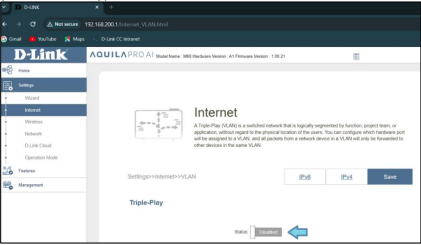
**VLAN settings**: Enable the VLAN state then Enter the VLAN ID’s may vary depending\
on your Internet Service Provider (ISP) or leave it disabled when your ISP does not\
require it.
* Enable **Triple-Play** if your ISP requires VLAN. Otherwise, leave it Disabled\
(default setting)
In this example we use TM Unifi VLAN IDs: (Make sure to enable VLAN Tag to manually input the VLAN IDs)
* **Internet VLAN: 500**
* **IPTV VLAN: 600**
* **VoIP VLAN: 400**
{% endstep %}
{% step %}
### Click Save.
{% endstep %}
{% endstepper %}